JavaWeb笔记(五)后端(Thymeleaf)(Tomcat类加载机制)(编写图书管理系统)
使用Thymeleaf模板引擎
虽然JSP为我们带来了便捷,但是其缺点也是显而易见的,那么有没有一种既能实现模板,又能兼顾前后端分离的模板引擎呢?
Thymeleaf(百里香叶)是一个适用于Web和独立环境的现代化服务器端Java模板引擎,官方文档:https://www.thymeleaf.org/documentation.html。
(区分 EL表达式 和 Thymeleaf:
1、EL表达式只和JSP挂钩,在html中是无法使用的;而thymeleaf是使用的html静态网页。(Thymeleaf是Spring-Boot官方推荐模板引擎)
2、要么使用EL + JSP,要么使用thymeleaf + html,两种模式不要混用,鱼和熊掌不可兼得。
)
那么它和JSP相比,好在哪里呢,我们来看官网给出的例子:
<table>
  <thead>
    <tr>
      <th th:text="#{msgs.headers.name}">Name</th>
      <th th:text="#{msgs.headers.price}">Price</th>
    </tr>
  </thead>
  <tbody>
    <tr th:each="prod: ${allProducts}">
      <td th:text="${prod.name}">Oranges</td>
      <td th:text="${#numbers.formatDecimal(prod.price, 1, 2)}">0.99</td>
    </tr>
  </tbody>
</table>
我们可以在前端页面中填写占位符,而这些占位符的实际值则由后端进行提供,这样,我们就不用再像JSP那样前后端都写在一起了。
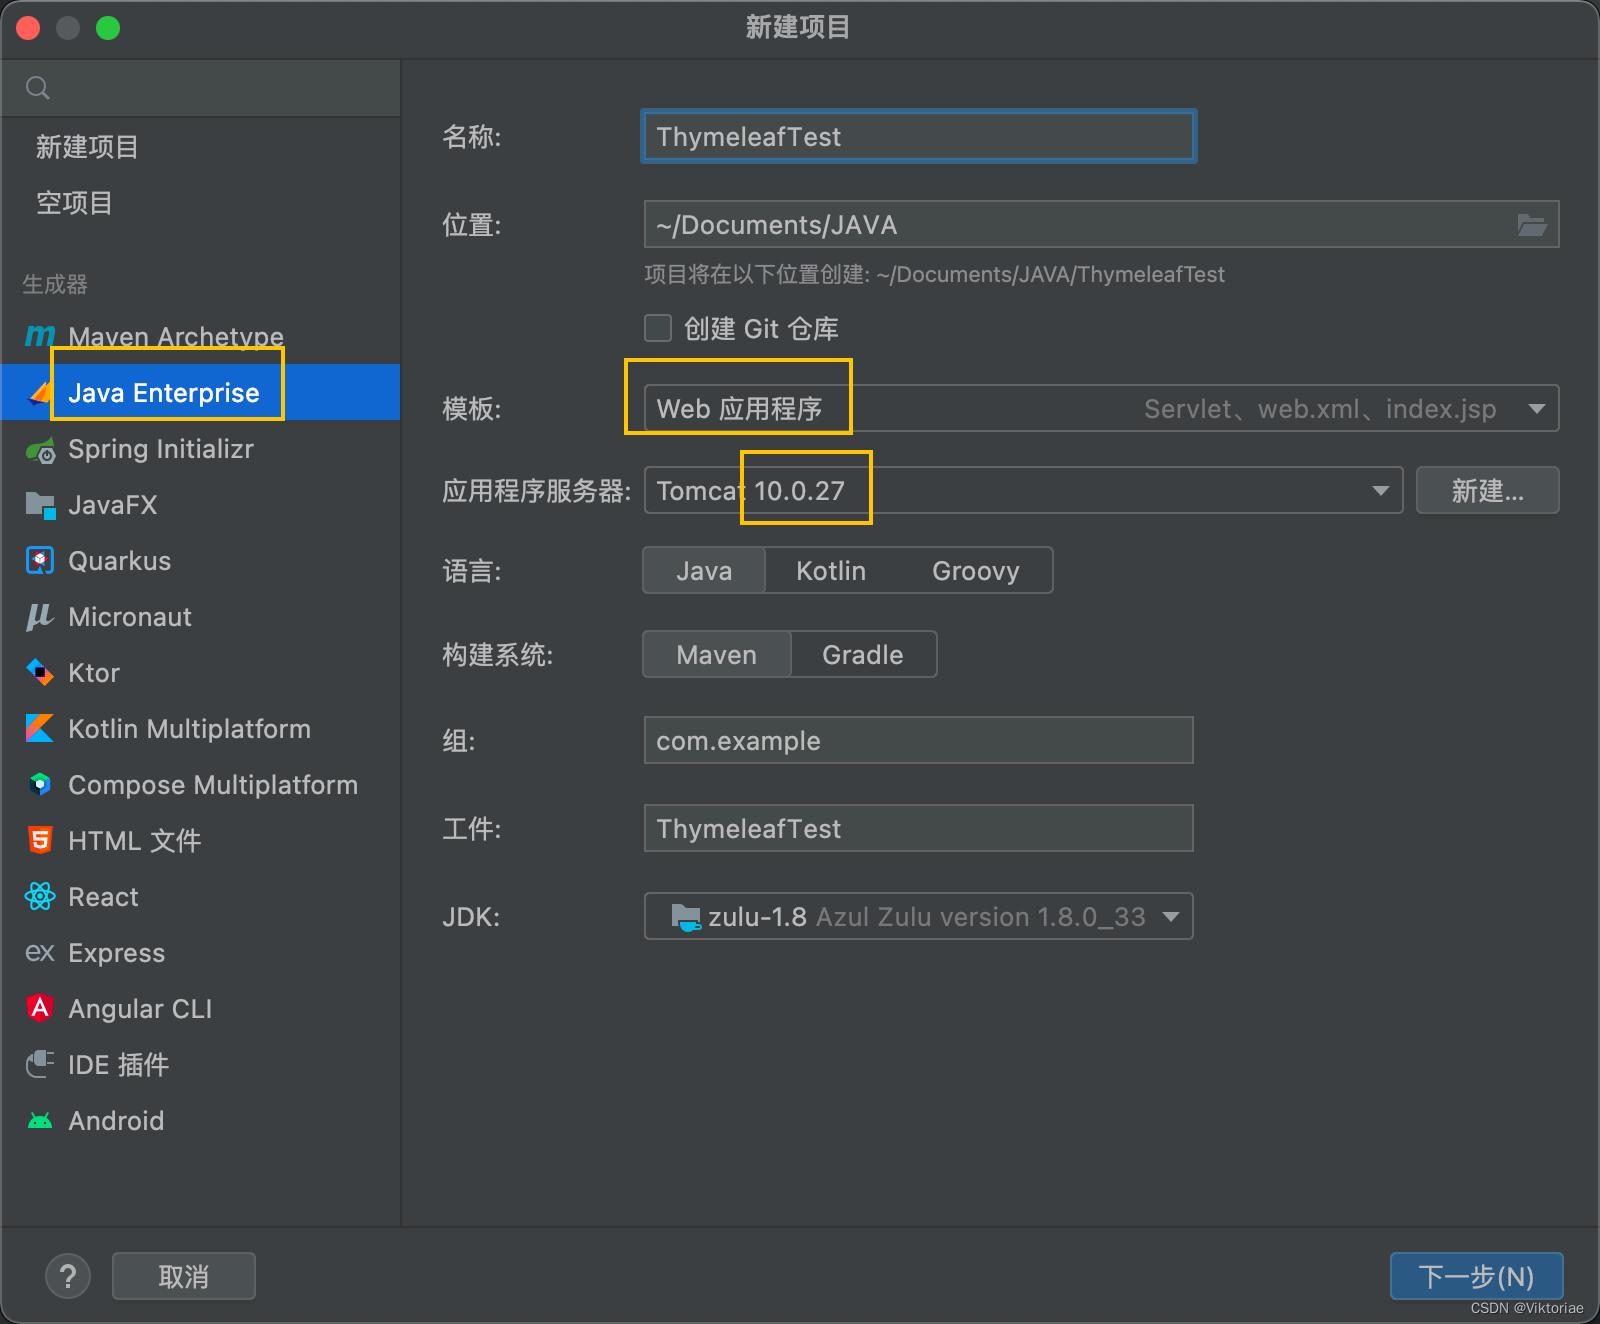
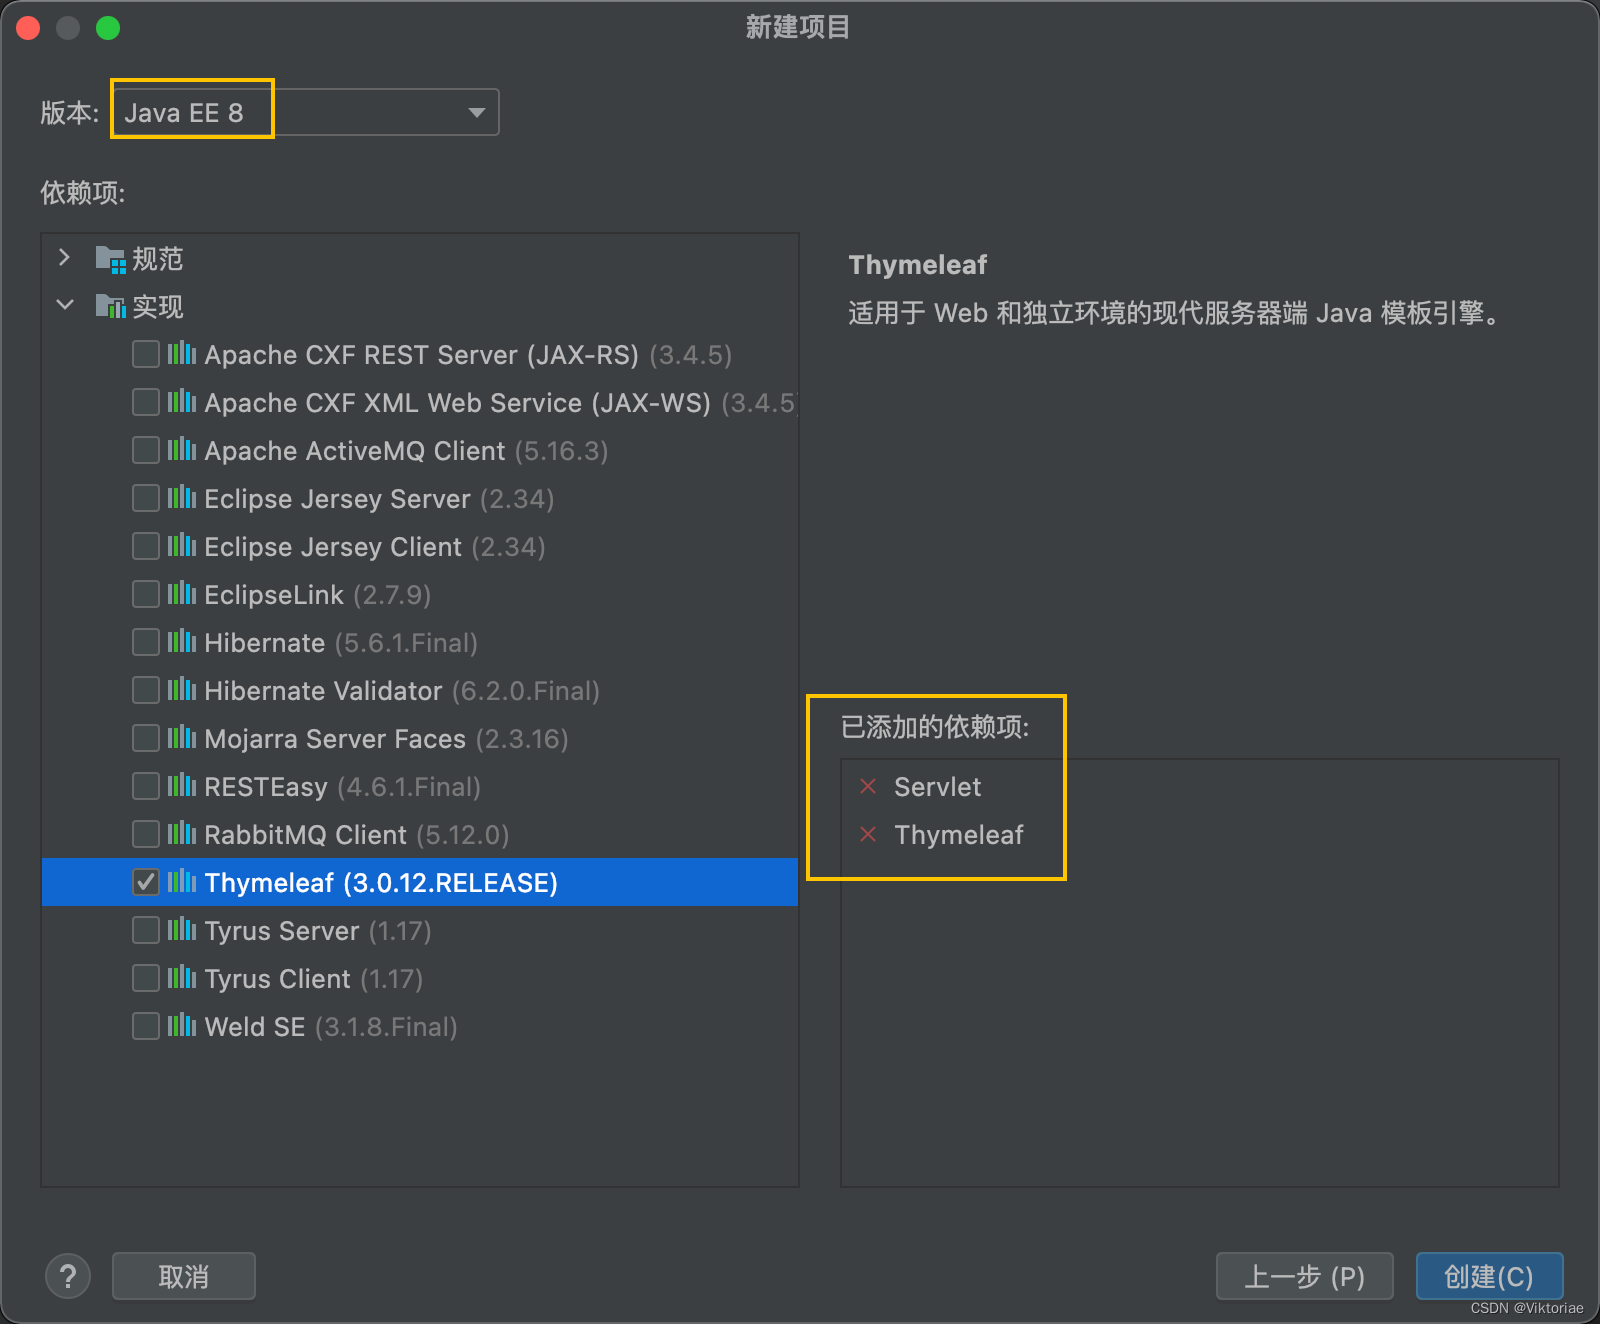
那么我们来创建一个例子感受一下,首先还是新建一个项目,注意,在创建时,勾选Thymeleaf依赖。
创建好项目后,首先要将pom.xml中关于servlet的依赖替换!!!
换成
<dependency>
    <groupId>jakarta.servlet</groupId>
    <artifactId>jakarta.servlet-api</artifactId>
    <version>5.0.0</version>
    <scope>provided</scope>
</dependency>
首先将项目自带的index.jsp删除
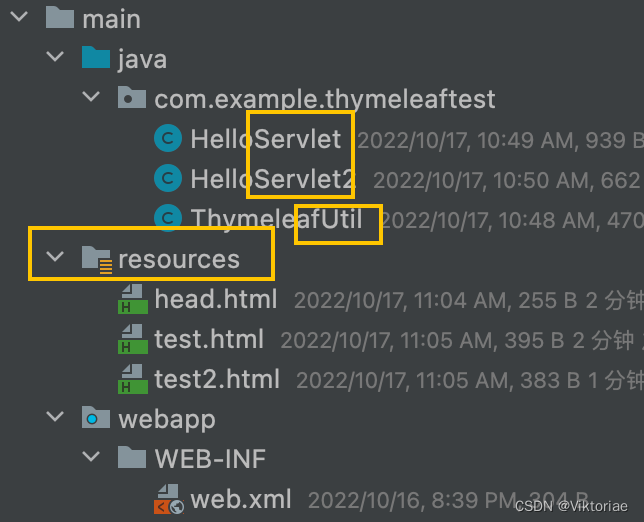
首先编写一个前端页面,名称为test.html,注意,是放在resource目录下,在html标签内部添加xmlns:th="http://www.thymeleaf.org"引入Thymeleaf定义的标签属性:
<!DOCTYPE html>
<html lang="en" xmlns:th="http://www.thymeleaf.org">
<head>
    <meta charset="UTF-8">
    <title>Title</title>
</head>
<body>
    <div th:text="${title}"></div>
</body>
</html>
接着我们编写一个Servlet作为默认页面:
(导入类:org.thymeleaf.context)
(将title作为占位符,一会儿会直接将title替换成“我是标题”)
(process其实是将页面拿出来进行解析,解析完后将内容发给浏览器)
@WebServlet("/index")
public class HelloServlet extends HttpServlet {

    TemplateEngine engine;
    @Override
    public void init() throws ServletException {
        engine = new TemplateEngine();
        ClassLoaderTemplateResolver r = new ClassLoaderTemplateResolver();
        engine.setTemplateResolver(r);
    }

    @Override
    protected void doGet(HttpServletRequest req, HttpServletResponse resp) throws ServletException, IOException {
        Context context = new Context();
        context.setVariable("title", "我是标题");
        engine.process("test.html", context, resp.getWriter());
    }
}

我们发现,浏览器得到的页面,就是已经经过模板引擎解析好的页面,而我们的代码依然是后端处理数据,前端展示数据,因此使用Thymeleaf就能够使得当前Web应用程序的前后端划分更加清晰。
虽然Thymeleaf在一定程度上分离了前后端,但是其依然是在后台渲染HTML页面并发送给前端,并不是真正意义上的前后端分离。
0、惯用配置
HelloServlet
@WebServlet("/index")
public class HelloServlet extends HttpServlet {

    @Override
    protected void doGet(HttpServletRequest req, HttpServletResponse resp) throws ServletException, IOException {
        Context context = new Context();
        context.setVariable("list", Arrays.asList("伞兵一号的故事", "倒一杯卡布奇诺", "玩游戏要啸着玩", "十七张牌前的电脑屏幕"));
        ThymeleafUtil.getEngine().process("test.html", context, resp.getWriter());
    }
}
ThymeleafUtil
public class ThymeleafUtil {

    private static final TemplateEngine engine;
    static  {
        engine = new TemplateEngine();
        ClassLoaderTemplateResolver r = new ClassLoaderTemplateResolver();
        engine.setTemplateResolver(r);
    }

    public static TemplateEngine getEngine() {
        return engine;
    }
}
1、Thymeleaf语法基础
那么,如何使用Thymeleaf呢?
首先我们看看后端部分,我们需要通过TemplateEngine对象来将模板文件渲染为最终的HTML页面:
TemplateEngine engine; // 模版引擎
@Override
public void init() throws ServletException {
    engine = new TemplateEngine();
  	//设定模板解析器决定了从哪里获取模板文件,这里直接使用ClassLoaderTemplateResolver表示加载内部资源文件
    ClassLoaderTemplateResolver r = new ClassLoaderTemplateResolver();
    engine.setTemplateResolver(r);
}
由于此对象只需要创建一次,之后就可以一直使用了。接着我们来看如何使用模板引擎进行解析:
@Override
protected void doGet(HttpServletRequest req, HttpServletResponse resp) throws ServletException, IOException {
    //创建上下文,上下文中包含了所有需要替换到模板中的内容
    Context context = new Context();
    context.setVariable("title", "<h1>我是标题</h1>");
    //通过此方法就可以直接解析模板并返回响应
    engine.process("test.html", context, resp.getWriter());
}
操作非常简单,只需要简单几步配置就可以实现模板的解析。接下来我们就可以在前端页面中通过上下文提供的内容,来将Java代码中的数据解析到前端页面。
接着我们来了解Thymeleaf如何为普通的标签添加内容,比如我们示例中编写的:
<div th:text="${title}"></div>
我们使用了th:text来为当前标签指定内部文本,注意任何内容都会变成普通文本,即使传入了一个HTML代码,如果我希望向内部添加一个HTML文本呢?我们可以使用th:utext属性:
<div th:utext="${title}"></div>
并且,传入的title属性,不仅仅只是一个字符串的值,而是一个字符串的引用,我们可以直接通过此引用调用相关的方法:
<div th:text="${title.toLowerCase()}"></div>
这样看来,Thymeleaf既能保持JSP为我们带来的便捷,也能兼顾前后端代码的界限划分。
除了替换文本,它还支持替换一个元素的任意属性,我们发现,th:能够拼接几乎所有的属性,一旦使用th:属性名称,那么属性的值就可以通过后端提供了,比如我们现在想替换一个图片的链接:
@Override
protected void doGet(HttpServletRequest req, HttpServletResponse resp) throws ServletException, IOException {
    Context context = new Context();
    context.setVariable("url", "http://n.sinaimg.cn/sinakd20121/600/w1920h1080/20210727/a700-adf8480ff24057e04527bdfea789e788.jpg");
  	context.setVariable("alt", "图片就是加载不出来啊");
    engine.process("test.html", context, resp.getWriter());
}
<!DOCTYPE html>
<html lang="en" xmlns:th="http://www.thymeleaf.org">
<head>
    <meta charset="UTF-8">
    <title>Title</title>
</head>
<body>
    <img width="700" th:src="${url}" th:alt="${alt}">
</body>
</html>
现在访问我们的页面,就可以看到替换后的结果了。
Thymeleaf还可以进行一些算术运算,几乎Java中的运算它都可以支持:
<div th:text="${value % 2}"></div>
同样的,它还支持三元运算:
<div th:text="${value % 2 == 0 ? 'yyds' : 'lbwnb'}"></div>
多个属性也可以通过+进行拼接,就像Java中的字符串拼接一样,这里要注意一下,字符串不能直接写,要添加单引号:
<div th:text="${name}+' 我是文本 '+${value}"></div>
2、Thymeleaf流程控制语法
除了一些基本的操作,我们还可以使用Thymeleaf来处理流程控制语句,当然,不是直接编写Java代码的形式,而是添加一个属性即可。
首先我们来看if判断语句,如果if条件满足,则此标签留下,若if条件不满足,则此标签自动被移除:
@Override
protected void doGet(HttpServletRequest req, HttpServletResponse resp) throws ServletException, IOException {
    Context context = new Context();
    context.setVariable("eval", true);
    engine.process("test.html", context, resp.getWriter());
}
<div th:if="${eval}">我是判断条件标签</div>
th:if会根据其中传入的值或是条件表达式的结果进行判断,只有满足的情况下,才会显示此标签,具体的判断规则如下:
-
如果值不是空的:
如果值是布尔值并且为true。
如果值是一个数字,并且是非零
如果值是一个字符,并且是非零
如果值是一个字符串,而不是“错误”、“关闭”或“否”
如果值不是布尔值、数字、字符或字符串。 -
如果值为空,th:if将计算为false
th:if还有一个相反的属性th:unless,效果完全相反,这里就不演示了。
我们接着来看多分支条件判断,我们可以使用th:switch属性来实现:
<div th:switch="${eval}">
    <div th:case="1">我是1</div>
    <div th:case="2">我是2</div>
    <div th:case="3">我是3</div>
</div>
只不过没有Default属性,但是我们可以使用th:case="*"来代替:
<div th:case="*">我是Default</div>
最后我们再来看看,它如何实现遍历,假如我们有一个存放书籍信息的List需要显示,那么如何快速生成一个列表呢?我们可以使用th:each来进行遍历操作:
@Override
protected void doGet(HttpServletRequest req, HttpServletResponse resp) throws ServletException, IOException {
    Context context = new Context();
    context.setVariable("list", Arrays.asList("伞兵一号的故事", "倒一杯卡布奇诺", "玩游戏要啸着玩", "十七张牌前的电脑屏幕"));
    engine.process("test.html", context, resp.getWriter());
}
<ul>
    <li th:each="title : ${list}" th:text="'《'+${title}+'》'"></li>
</ul>
th:each中需要填写 “单个元素名称 : ${列表}”,这样,所有的列表项都可以使用遍历的单个元素,只要使用了th:each,都会被循环添加。因此最后生成的结果为:
<ul>
    <li>《伞兵一号的故事》</li>
    <li>《倒一杯卡布奇诺》</li>
    <li>《玩游戏要啸着玩》</li>
    <li>《十七张牌前的电脑屏幕》</li>
</ul>
我们还可以获取当前循环的迭代状态,只需要在最后添加iterStat即可,从中可以获取很多信息,比如当前的顺序:
<ul>
    <li th:each="title, iterStat : ${list}" th:text="${iterStat.index}+'.《'+${title}+'》'"></li>
</ul>
状态变量在th:each属性中定义,并包含以下数据:
- 当前迭代索引,以0开头。这是index属性。
- 当前迭代索引,以1开头。这是count属性。
- 迭代变量中的元素总量。这是size属性。
- 每个迭代的迭代变量。这是current属性。
- 当前迭代是偶数还是奇数。这些是even/odd布尔属性。
- 当前迭代是否是第一个迭代。这是first布尔属性。
- 当前迭代是否是最后一个迭代。这是last布尔属性。
通过了解了流程控制语法,现在我们就可以很轻松地使用Thymeleaf来快速替换页面中的内容了。
3、Thymeleaf模板布局
在某些网页中,我们会发现,整个网站的页面,除了中间部分的内容会随着我们的页面跳转而变化外,有些部分是一直保持一个状态的,比如打开小破站,我们翻动评论或是切换视频分P的时候,变化的仅仅是对应区域的内容,实际上,其他地方的内容会无论内部页面如何跳转,都不会改变。
Thymeleaf就可以轻松实现这样的操作,我们只需要将不会改变的地方设定为模板布局,并在不同的页面中插入这些模板布局,就无需每个页面都去编写同样的内容了。现在我们来创建两个页面:
<!DOCTYPE html>
<html lang="en" xmlns:th="http://www.thymeleaf.org">
<head>
    <meta charset="UTF-8">
    <title>Title</title>
</head>
<body>
    <div class="head">
        <div>
            <h1>我是标题内容,每个页面都有</h1>
        </div>
        <hr>
    </div>
    <div class="body">
        <ul>
            <li th:each="title, iterStat : ${list}" th:text="${iterStat.index}+'.《'+${title}+'》'"></li>
        </ul>
    </div>
</body>
</html>
test2.html
<!DOCTYPE html>
<html lang="en" xmlns:th="http://www.thymeleaf.org">
<head>
    <meta charset="UTF-8">
    <title>Title</title>
</head>
<body>
    <div class="head">
        <div>
            <h1>我是标题内容,每个页面都有</h1>
        </div>
        <hr>
    </div>
    <div class="body">
        <div>这个页面的样子是这样的</div>
    </div>
</body>
</html>
接着将模板引擎写成工具类的形式:
(然后将HelloServlet中的init以及上面的engine删除)
public class ThymeleafUtil {

    private static final TemplateEngine engine;
    static  {
        engine = new TemplateEngine();
        ClassLoaderTemplateResolver r = new ClassLoaderTemplateResolver();
        engine.setTemplateResolver(r);
    }

    public static TemplateEngine getEngine() {
        return engine;
    }
}
@WebServlet("/index2")
public class HelloServlet2 extends HttpServlet {

    @Override
    protected void doGet(HttpServletRequest req, HttpServletResponse resp) throws ServletException, IOException {
        Context context = new Context();
        ThymeleafUtil.getEngine().process("test2.html", context, resp.getWriter());
    }
}
现在就有两个Servlet分别对应两个页面了,但是这两个页面实际上是存在重复内容的,我们要做的就是将这些重复内容提取出来。
我们单独编写一个head.html来存放重复部分:
(th:fragment 表示这是一个可以用来替换的模版)
<!DOCTYPE html>
<html xmlns:th="http://www.thymeleaf.org" lang="en">
<body>
    <div class="head" th:fragment="head-title">
        <div>
            <h1>我是标题内容,每个页面都有</h1>
        </div>
        <hr>
    </div>
</body>
</html>
现在,我们就可以直接将页面中的内容快速替换:
(也就是说只需要用<div th:replace="head.html::head-title"></div>这样一句话即可替换之前的)
<div th:replace="head.html::head-title"></div>
<div class="body">
    <ul>
        <li th:each="title, iterStat : ${list}" th:text="${iterStat.index}+'.《'+${title}+'》'"></li>
    </ul>
</div>
我们可以使用th:insert和th:replace和th:include这三种方法来进行页面内容替换,那么th:insert和th:replace(和th:include,自3.0年以来不推荐)有什么区别?
th:insert最简单:它只会插入指定的片段作为标签的主体。 (把所有东西塞到这个div里面,也就是说相比于replace的效果外面多了一层div)th:replace实际上将标签直接替换为指定的片段。th:include和th:insert相似,但它没有插入片段,而是只插入此片段的内容。
你以为这样就完了吗?它还支持参数传递,比如我们现在希望插入二级标题,并且由我们的子页面决定(也就是说在每个页面中不一样)
<div class="head" th:fragment="head-title">
    <div>
        <h1>我是标题内容,每个页面都有</h1>
        <h2>我是二级标题</h2>
    </div>
    <hr>
</div>
稍加修改,就像JS那样添加一个参数名称:
<div class="head" th:fragment="head-title(sub)">
    <div>
        <h1>我是标题内容,每个页面都有</h1>
        <h2 th:text="${sub}"></h2>
    </div>
    <hr>
</div>
现在直接在替换位置添加一个参数即可:
<div th:include="head.html::head-title('这个是第1个页面的二级标题')"></div>
<div class="body">
    <ul>
        <li th:each="title, iterStat : ${list}" th:text="${iterStat.index}+'.《'+${title}+'》'"></li>
    </ul>
</div>
这样,不同的页面还有着各自的二级标题。
探讨Tomcat类加载机制
有关JavaWeb的内容,我们就聊到这里,在最后,我们还是来看一下Tomcat到底是如何加载和运行我们的Web应用程序的。
Tomcat服务器既然要同时运行多个Web应用程序,那么就必须要实现不同应用程序之间的隔离,也就是说,Tomcat需要分别去加载不同应用程序的类以及依赖,还必须保证应用程序之间的类无法相互访问,而传统的类加载机制无法做到这一点,同时每个应用程序都有自己的依赖,如果两个应用程序使用了同一个版本的同一个依赖,那么还有必要去重新加载吗,带着诸多问题,Tomcat服务器编写了一套自己的类加载机制。
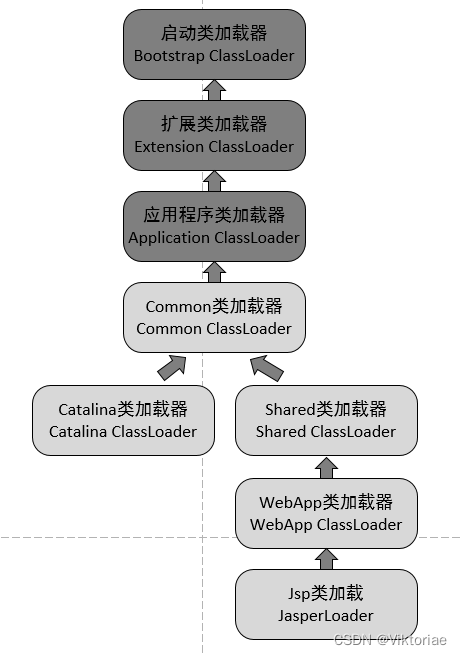
首先我们要知道,Tomcat本身也是一个Java程序,它要做的是去动态加载我们编写的Web应用程序中的类,而要解决以上提到的一些问题,就出现了几个新的类加载器,我们来看看各个加载器的不同之处:
- Common ClassLoader:Tomcat最基本的类加载器,加载路径中的class可以被Tomcat容器本身以及各个Web应用程序访问。
- Catalina ClassLoader:Tomcat容器私有的类加载器,加载路径中的class对于Web应用程序不可见。
- Shared ClassLoader:各个Web应用程序共享的类加载器,加载路径中的class对于所有Web应用程序可见,但是对于Tomcat容器不可见。
- Webapp ClassLoader:各个Web应用程序私有的类加载器,加载路径中的class只对当前Web应用程序可见,每个Web应用程序都有一个自己的类加载器,此加载器可能存在多个实例。
- JasperLoader:JSP类加载器,每个JSP文件都有一个自己的类加载器,也就是说,此加载器可能会存在多个实例。
通过这样进行划分,就很好地解决了我们上面所提到的问题,但是我们发现,这样的类加载机制,破坏了JDK的双亲委派机制(在JavaSE阶段讲解过),比如Webapp ClassLoader,它只加载自己的class文件,它没有将类交给父类加载器进行加载,也就是说,我们可以随意创建和JDK同包同名的类,岂不是就出问题了?
难道Tomcat的开发团队没有考虑到这个问题吗?

实际上,WebAppClassLoader的加载机制是这样的:WebAppClassLoader 加载类的时候,绕开了 AppClassLoader,直接先使用 ExtClassLoader 来加载类。这样的话,如果定义了同包同名的类,就不会被加载,而如果是自己定义 的类,由于该类并不是JDK内部或是扩展类,所有不会被加载,而是再次回到WebAppClassLoader进行加载,如果还失败,再使用AppClassloader进行加载。
实战:编写图书管理系统
图书管理系统需要再次迎来升级,现在,我们可以直接访问网站来操作图书,这里我们给大家提供一个前端模板直接编写,省去编写前端的时间。
本次实战使用到的框架:Servlet+Mybatis+Thymeleaf
(一)总体设计分析
注意在编写的时候,为了使得整体的代码简洁高效,我们严格遵守三层架构模式:
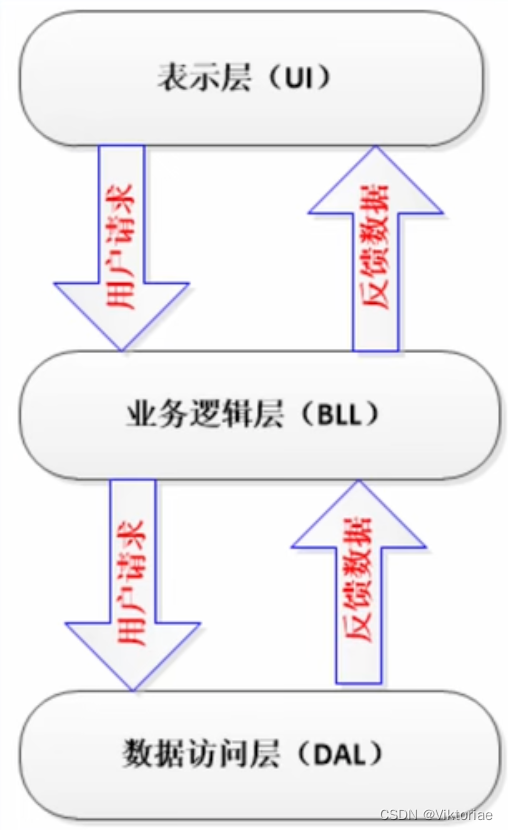
就是说,表示层(Servlet)只做UI,包括接受请求和响应,给模版添加上下文,以及进行页面的解析,最后响应给浏览器;业务逻辑层才是用于进行数据处理的地方,表示层需要向逻辑层索要数据,才能将数据添加到模版的上下文中;数据访问层一般就是连接数据库,包括增删改查等基本的数据库操作,业务逻辑层如果需要从数据库取数据,就需要向数据访问层请求数据。
当然,贯穿三大层次的当属实体类了,我们还需要创建对应的实体类进行数据的封装,以便于在三层架构中进行数据传输。
接下来,明确我们要实现的功能,也就是项目需求:
- 图书管理员的登录和退出(只有登录之后才能进行管理页面)
- 图书的列表浏览(包括书籍是否被借出的状态也要进行显示)以及图书的添加和删除
- 学生的列表浏览
- 查看所有的借阅列表,添加借阅信息
(二)登录和拦截
(我们还是接着用之前的book_manage表)
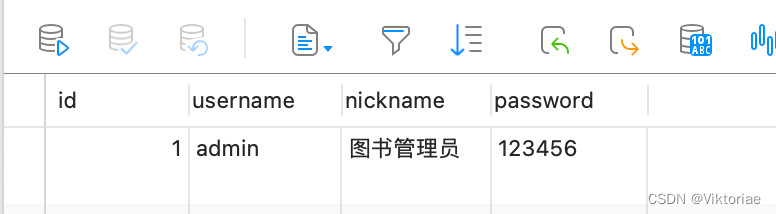
新建一张表admin:
(id还要勾选“自动递增”)

然后添加一条记录:
新建项目:
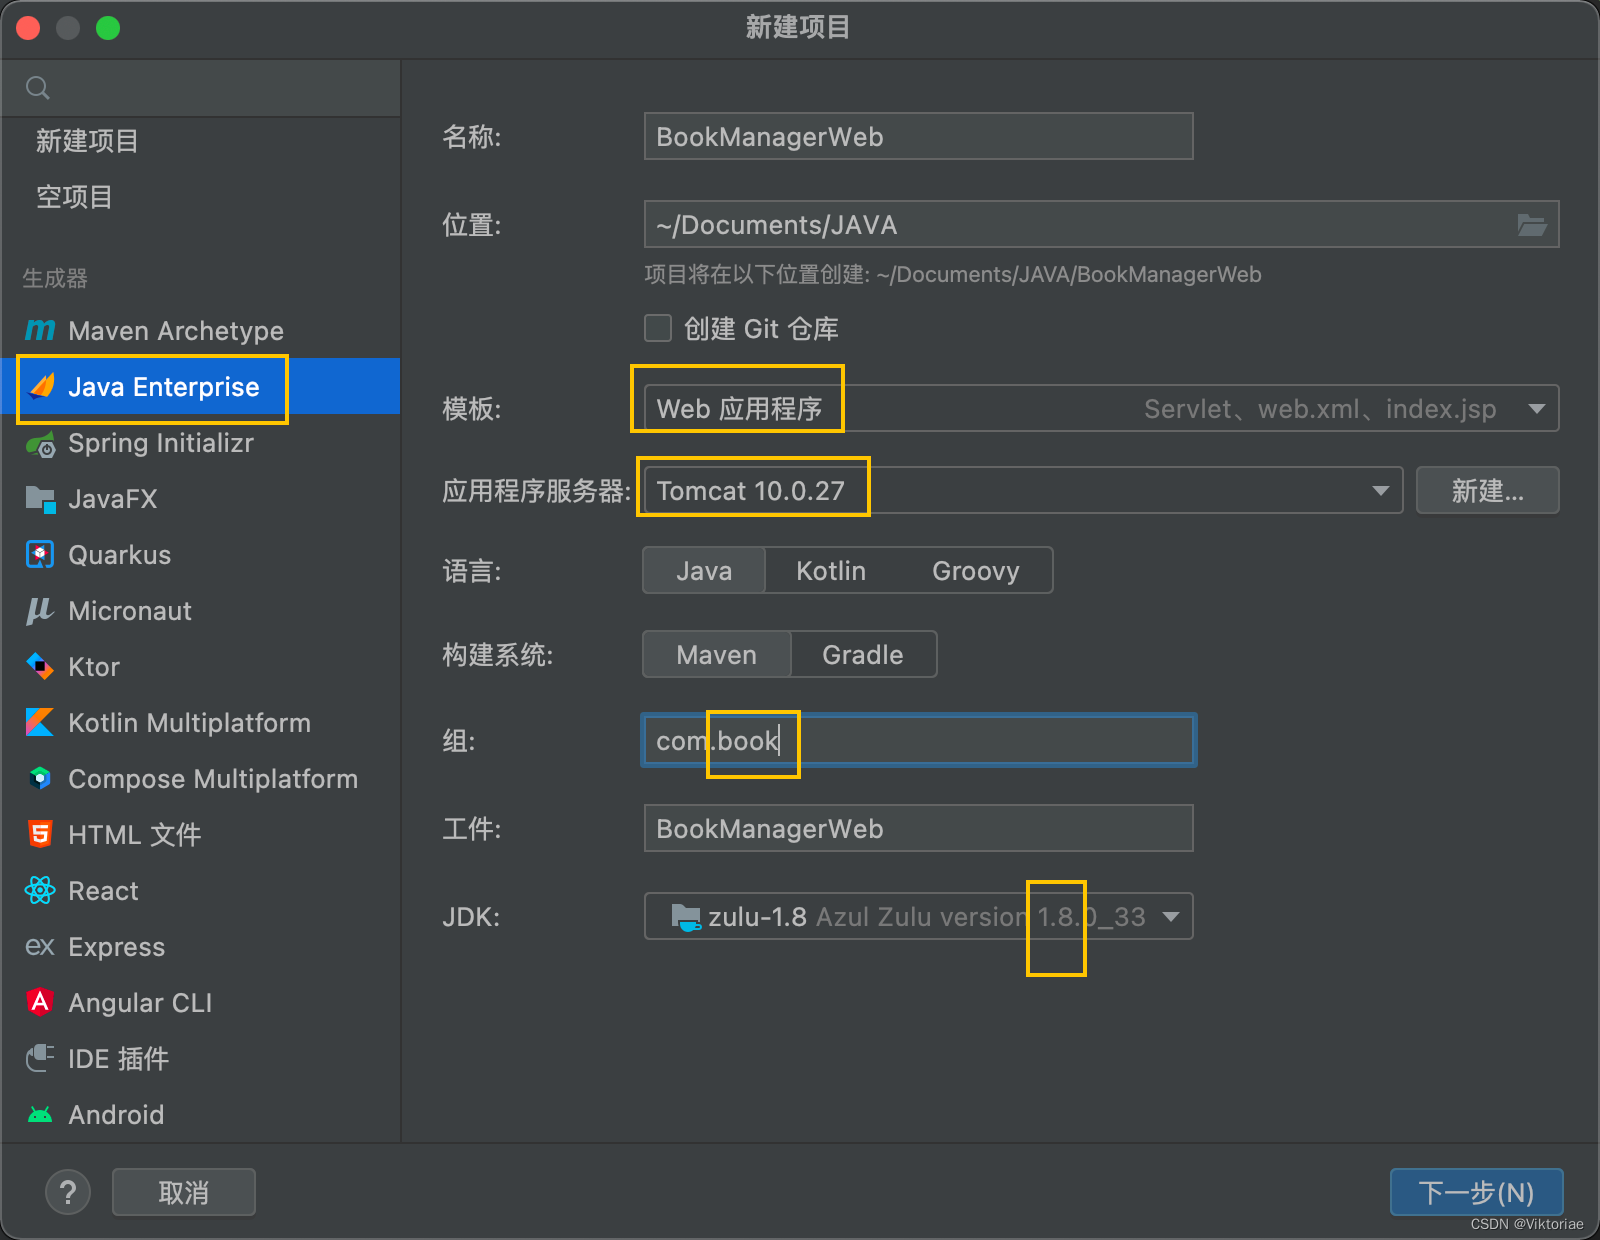
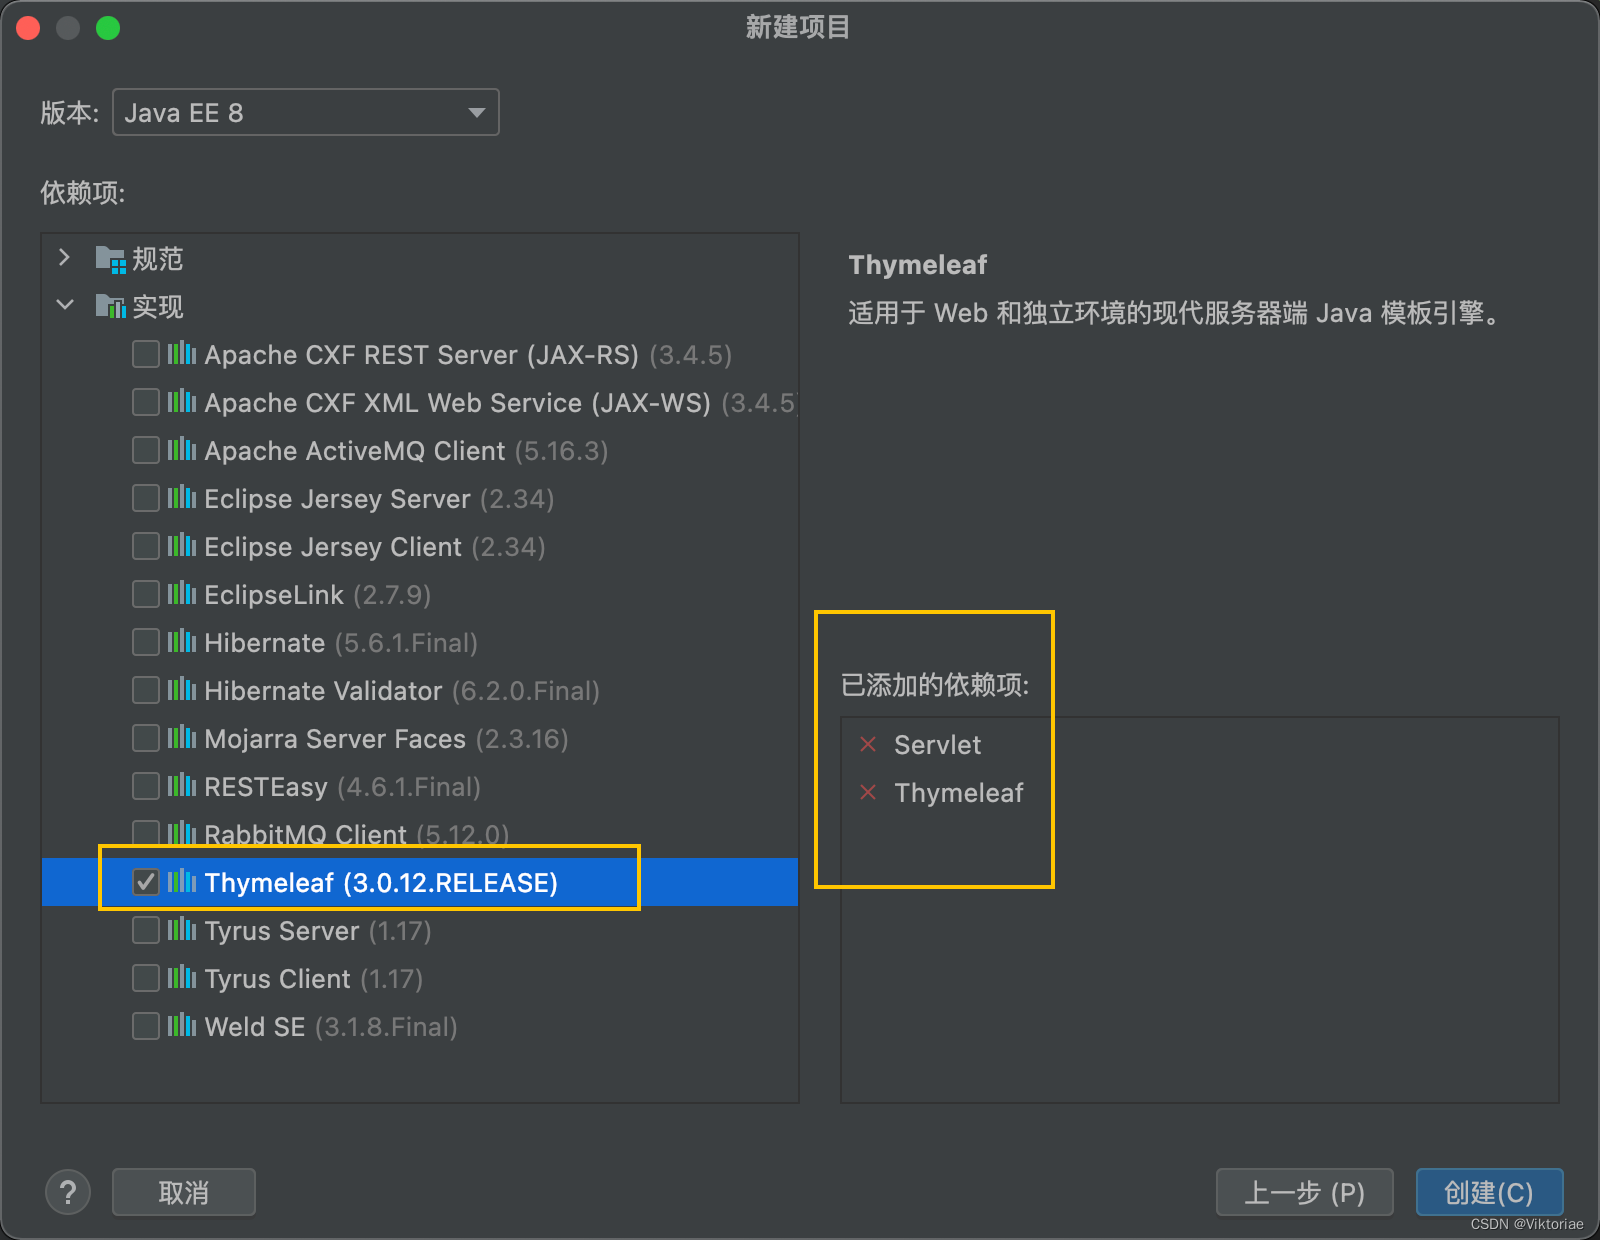
然后勾选Thymeleaf依赖!!
(然后将默认自带的index.jsp和HelloServlet和包名都删除)
然后首先修改pom.xml中的servlet的依赖
<dependency>
    <groupId>jakarta.servlet</groupId>
    <artifactId>jakarta.servlet-api</artifactId>
    <version>5.0.0</version>
    <scope>provided</scope>
</dependency>
然后添加lombok的依赖、jdbc、mybatis
<?xml version="1.0" encoding="UTF-8"?>
<project xmlns="http://maven.apache.org/POM/4.0.0"
         xmlns:xsi="http://www.w3.org/2001/XMLSchema-instance"
         xsi:schemaLocation="http://maven.apache.org/POM/4.0.0 https://maven.apache.org/xsd/maven-4.0.0.xsd">
    <modelVersion>4.0.0</modelVersion>

    <groupId>com.book</groupId>
    <artifactId>BookManagerWeb</artifactId>
    <version>1.0-SNAPSHOT</version>
    <name>BookManagerWeb</name>
    <packaging>war</packaging>

    <properties>
        <project.build.sourceEncoding>UTF-8</project.build.sourceEncoding>
        <maven.compiler.target>1.8</maven.compiler.target>
        <maven.compiler.source>1.8</maven.compiler.source>
        <junit.version>5.8.2</junit.version>
    </properties>

    <dependencies>
        <dependency>
            <groupId>jakarta.servlet</groupId>
            <artifactId>jakarta.servlet-api</artifactId>
            <version>5.0.0</version>
            <scope>provided</scope>
        </dependency>
        <dependency>
            <groupId>org.projectlombok</groupId>
            <artifactId>lombok</artifactId>
            <version>1.18.22</version>
        </dependency>
        <dependency>
            <groupId>mysql</groupId>
            <artifactId>mysql-connector-java</artifactId>
            <version>8.0.27</version>
        </dependency>
        <dependency>
            <groupId>org.mybatis</groupId>
            <artifactId>mybatis</artifactId>
            <version>3.5.7</version>
        </dependency>
        <dependency>
            <groupId>org.thymeleaf</groupId>
            <artifactId>thymeleaf</artifactId>
            <version>3.0.12.RELEASE</version>
        </dependency>
        <dependency>
            <groupId>org.junit.jupiter</groupId>
            <artifactId>junit-jupiter-api</artifactId>
            <version>${junit.version}</version>
            <scope>test</scope>
        </dependency>
        <dependency>
            <groupId>org.junit.jupiter</groupId>
            <artifactId>junit-jupiter-engine</artifactId>
            <version>${junit.version}</version>
            <scope>test</scope>
        </dependency>
    </dependencies>

    <build>
        <plugins>
            <plugin>
                <groupId>org.apache.maven.plugins</groupId>
                <artifactId>maven-war-plugin</artifactId>
                <version>3.3.2</version>
            </plugin>
        </plugins>
    </build>
</project>
将前端模版的login.html复制到resources目录下
注意到这个页面还引用了 静态资源(样式之类的)
因此,我们再将static这个文件夹复制到webapp目录下(之所以放在resources目录下是因为login.html需要通过thymeleaf来进行动态解析)
com.book.utils.ThymeleafUtil
比之前的ThymeleafUtil更工具类的写法:
public class ThymeleafUtil {

    private static final TemplateEngine engine;
    static  {
        engine = new TemplateEngine();
        ClassLoaderTemplateResolver r = new ClassLoaderTemplateResolver();
        engine.setTemplateResolver(r);
    }

    public static void process(String template, IContext context, Writer writer) {
        engine.process(template, context, writer);
    }
}
创建com.book.servlet.LoginServlet并修改Tomcat配置

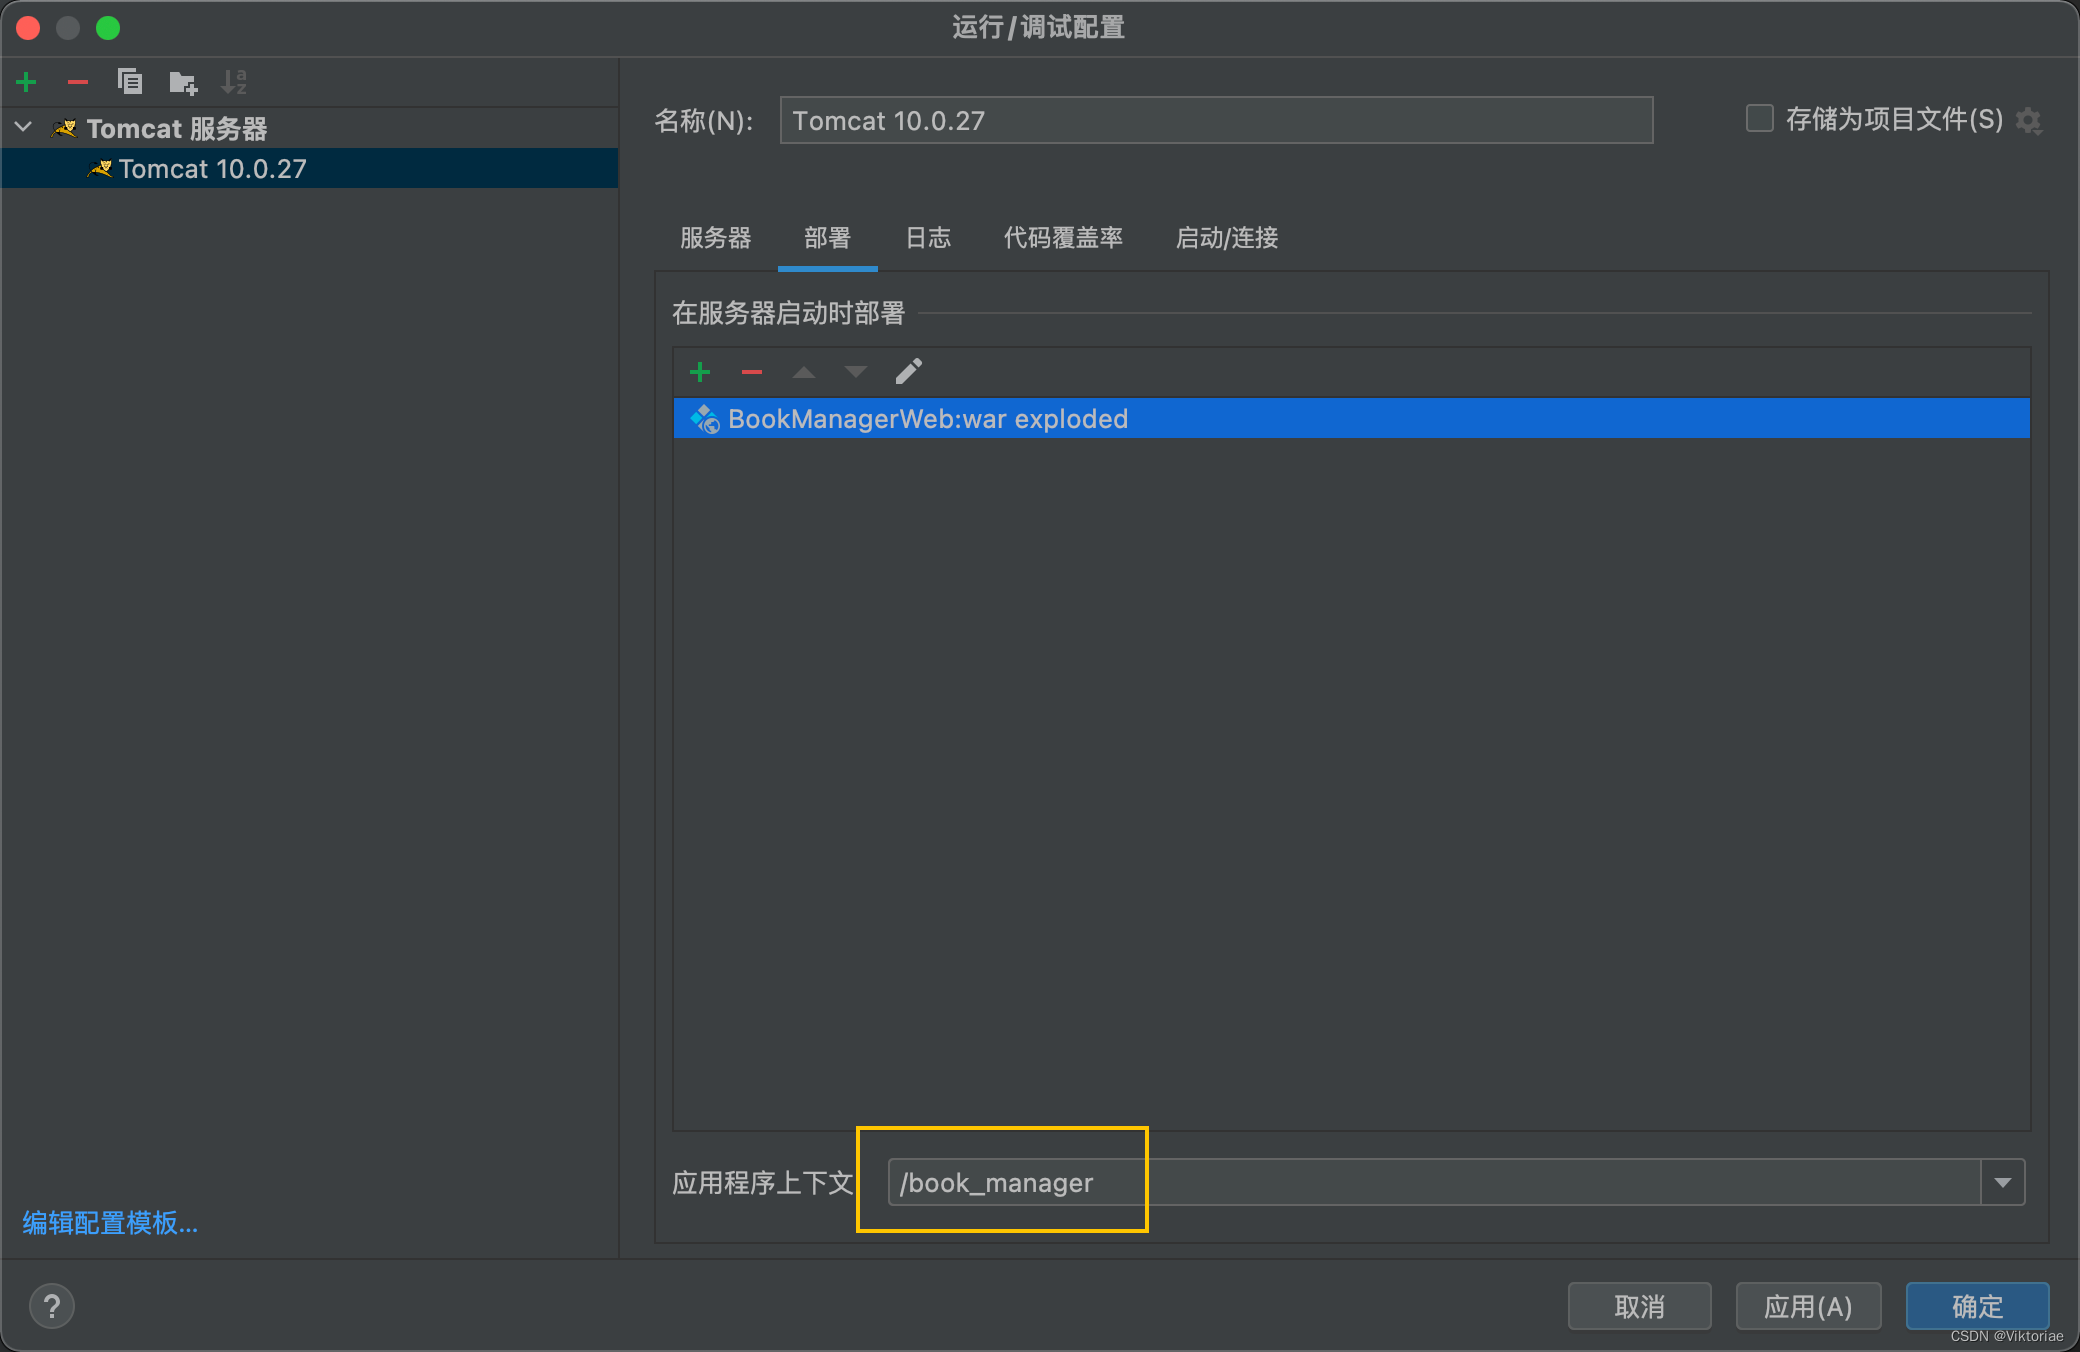
注意浏览器访问网页是GET请求!!
替换login.html中的内容
1、去除logo
2、更改标题title
3、改中文
4、表单中: 邮箱 -> 用户名称;并增加name属性
5、表单中: password -> 密码;并增加name属性
5、表单中: 勾选框 Remember Me -> 记住我;并修改name属性
6、“Forgot Password?“ -> “忘记密码?” (但由于我们不写这个功能,直接将链接改成#)
7、登录按钮,从a链接变成button;“登录”
8、“Don’t have an account?“ -> “没有用户吗?”;
9、“Click Here“ -> “注册用户”(由于这里我们仍然不写这个功能,所以还是将链接换成#)
10、删掉最下面的Duhh!所在的div
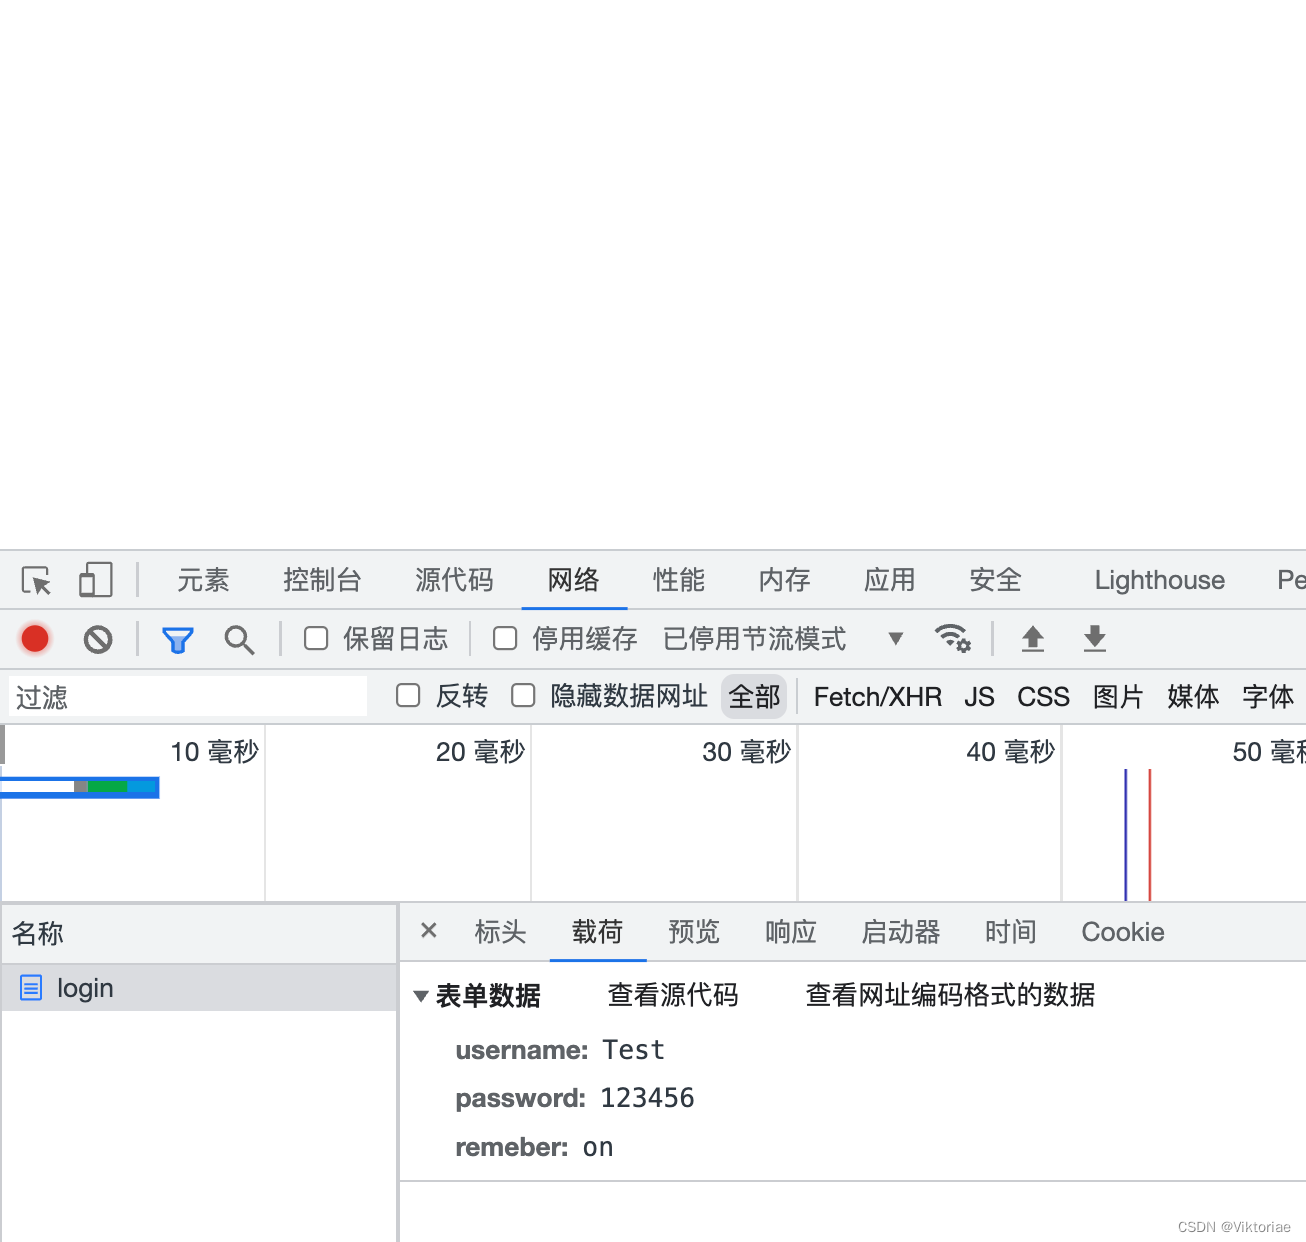
11、定义form表单的行为为post,然后我们将行为转给LoginServlet(刚才浏览器直接访问/login是GET请求,现在是POST请求,因此我们写一个doPOST)
<form method="post" action="/login">
com.book.entity.User
@Data
public class User {
    int id;
    String username;
    String nickname;
    String password;
}
com.book.filter.MainFilter
@WebFilter(“/*”)表示全部匹配,全部走这个拦截器
放行 的情况:请求的是静态资源 or 请求登录页面
其他情况下要进行判断,看session中是否有用户
观察我们这个项目,静态资源的路径中肯定带有static
@WebFilter("/*")
public class MainFilter extends HttpFilter {
    @Override
    protected void doFilter(HttpServletRequest req, HttpServletResponse res, FilterChain chain) throws IOException, ServletException {
        String url = req.getRequestURL().toString();
        if (!url.contains("/static/") && !url.endsWith("login")) {
            HttpSession session = req.getSession();
            User user = (User) session.getAttribute("user");
            if (user == null) {
                res.sendRedirect("login");
                return ;
            }
        }
        chain.doFilter(req, res);
    }
}
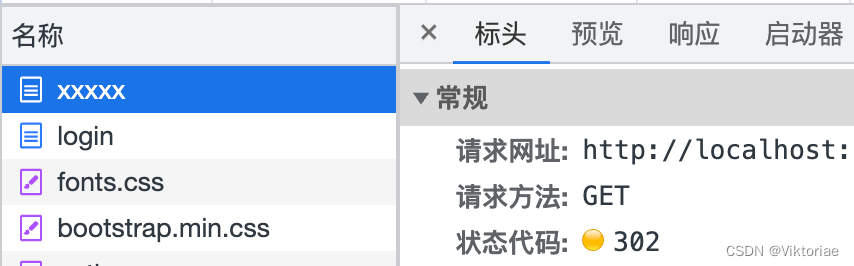
然后我们发现没有登录的情况下随便输入一个不是login的网址(比如/xxxxxx)就会直接重定向到/login
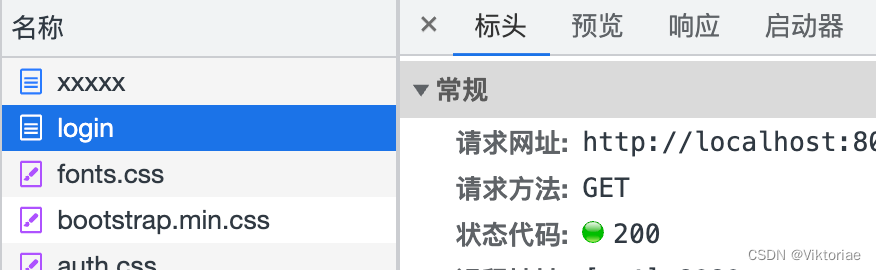
再观察下面可以发现这些静态资源是可以正常的访问到的:
resources/mybatis-config.xml
创建“数据源”就可以填写这个url
<?xml version="1.0" encoding="UTF-8" ?>
<!DOCTYPE configuration
        PUBLIC "-//mybatis.org//DTD Config 3.0//EN"
        "http://mybatis.org/dtd/mybatis-3-config.dtd">
<configuration>
    <environments default="development">
        <environment id="development">
            <transactionManager type="JDBC"/>
            <dataSource type="POOLED">
                <property name="driver" value="com.mysql.cj.jdbc.Driver"/>
                <property name="url" value="jdbc:mysql://localhost:3306/book_manage"/>
                <property name="username" value="root"/>
                <property name="password" value="root123456"/>
            </dataSource>
        </environment>
    </environments>
    <mappers>
        <mapper class="com.example.mapper.UserMapper"/>
    </mappers>
</configuration>
com.book.dao.UserMapper接口
public interface UserMapper {

    @Select("select * from admin where username = #{username} and password = #{password")
    User getUser(@Param("username") String username, @Param("password") String password);
}
com.book.utils.MybatisUtil
小技巧:发现引号里面的mybatis-config.xml变绿了说明就是对了
public class MybatisUtil {

    private static SqlSessionFactory factory;
    static {
        try {
            factory = new SqlSessionFactoryBuilder().build(Resources.getResourceAsReader("mybatis-config.xml"));
        } catch (IOException e) {
            throw new RuntimeException(e);
        }
    }

    public static SqlSession getSession() {
        return factory.openSession(true);
    }
}
com.book.service.UserService接口
从这里开始我们就是写业务逻辑层service
一般写法:接口只用来定义(只是定义,不是实现)业务逻辑相关的操作,然后单独再写一个类取实现),然后我们上一层使用只需要导接口即可,不需要关心具体的实现
auth方法判断用户是否登录成功
由于登录成功之后还要往session中丢东西,因此还要把HttpSession拿过来
public interface UserService {
    boolean auth(String username, String password, HttpSession session);
}
接下来就写这个行为的实现
com.book.service.impl.UserServiceImpl
public class UserServiceImpl implements UserService {
    @Override
    public boolean auth(String username, String password, HttpSession session) {
        try (SqlSession sqlSession = MybatisUtil.getSession()) {
            UserMapper mapper = sqlSession.getMapper(UserMapper.class);
            User user = mapper.getUser(username, password);
            if (user == null) return false;
            session.setAttribute("user", user);
            return true;
        }
    }
}
LoginServlet中使用userService
现在用上面这个service来处理数据,注意这里用的是接口!
我们在初始化的方法里把它初始化一下,因此Override init方法
@WebServlet("/login")
public class LoginServlet extends HttpServlet {

    UserService service;
    @Override
    public void init() throws ServletException {
        service = new UserServiceImpl();
    }
然后写doPost:
由于如果登录失败了,要在底下显示一串红字,那它怎么知道什么时候显示红字呢?