JUC - 多线程之Synchronized和Lock锁;生产者消费者模式(一)
阅读前可参考
Java--多线程之并发,并行,进程,线程(一)_MinggeQingchun的博客-CSDN博客
Java--多线程之终止/中断线程(二)_MinggeQingchun的博客-CSDN博客_java中断线程
Java--多线程之join,yield,sleep;线程优先级;定时器;守护线程(三)_MinggeQingchun的博客-CSDN博客
Java--多线程之synchronized和lock;死锁(四)_MinggeQingchun的博客-CSDN博客
Java--多线程之生产者消费者模式;线程池ExecutorService(五)_MinggeQingchun的博客-CSDN博客
JUC是JDK中 java.util.concurrent 包的简称,该包提供了并发编程中常用的工具类
概括地说,JUC 就是Java并发编程工具包
目前JUC泛指Java多线程开发技术

首先,再简单说一下并行、并发;进程、线程
一、并行、并发;进程、线程
具体参考
Java--多线程之并发,并行,进程,线程(一)_MinggeQingchun的博客-CSDN博客
并行是指两个或者多个事件在同一时刻发生,而并发是指两个或多个事件在同一时间间隔发生。
并行是在不同实体上的多个事件,并发是在同一实体上的多个事件
(一)并行
并行(Parallel)
在同一时刻,有多条指令在多个处理器上同时执行
(二)并发
并发(Concurrent)
在同一时刻只能有一条指令执行,但多个进程指令被快速的轮换执行,使得在宏观上具有多个进程同时执行的效果,但在微观上并不是同时执行的,只是把时间分成若干段,使多个进程快速交替的执行
并发是指一个CPU处理器同时处理多个任务
并行是指多个CPU处理器或者是多核的处理器同时处理多个不同的任务
并发是逻辑上的同时发生(simultaneous),并行是物理上的同时发生
1、并发针对单核 CPU 而言,它指的是 CPU 交替执行不同任务的能力;并行针对多核 CPU 而言,它指的是多个核心同时执行多个任务的能力。
2、单核 CPU 只能并发,无法并行;换句话说,并行只可能发生在多核 CPU 中
3、在多核 CPU 中,并发和并行一般都会同时存在,它们都是提高 CPU 处理任务能力的重要手段
(三)进程
一个任务,一个应用程序就是一个进程(Process)
如打开一个浏览器就是启动一个浏览器进程,打开一个记事本就是启动一个记事本进程
(四)线程
在一个进程内部,要同时干多件事,就需要同时运行多个“子任务”,我们把进程内的这些“子任务”称为线程(Thread)
如在一个记事本上打字,画图等子任务,这些子任务之间共用同一个进程资源
(五)线程创建的三种方式
Java中,默认就有两个线程:main主线程;GC垃圾回收线程
ava不能操作硬件CPU,因此也无法直接开启多线程,底层是调用本地方法C++的方法开启线程
    /**
     * Causes this thread to begin execution; the Java Virtual Machine
     * calls the <code>run</code> method of this thread.
     * <p>
     * The result is that two threads are running concurrently: the
     * current thread (which returns from the call to the
     * <code>start</code> method) and the other thread (which executes its
     * <code>run</code> method).
     * <p>
     * It is never legal to start a thread more than once.
     * In particular, a thread may not be restarted once it has completed
     * execution.
     *
     * @exception  IllegalThreadStateException  if the thread was already
     *               started.
     * @see        #run()
     * @see        #stop()
     */
    public synchronized void start() {
        /**
         * This method is not invoked for the main method thread or "system"
         * group threads created/set up by the VM. Any new functionality added
         * to this method in the future may have to also be added to the VM.
         *
         * A zero status value corresponds to state "NEW".
         */
        if (threadStatus != 0)
            throw new IllegalThreadStateException();

        /* Notify the group that this thread is about to be started
         * so that it can be added to the group's list of threads
         * and the group's unstarted count can be decremented. */
        group.add(this);

        boolean started = false;
        try {
            start0();
            started = true;
        } finally {
            try {
                if (!started) {
                    group.threadStartFailed(this);
                }
            } catch (Throwable ignore) {
                /* do nothing. If start0 threw a Throwable then
                  it will be passed up the call stack */
            }
        }
    }

    private native void start0();
1、继承java.lang.Thread类,重写run方法
/**
 1、实现线程有3种方式:
    1、编写一个类,直接继承java.lang.Thread,重写run方法
    2、编写一个类实现java.lang.Runnable接口
    3、编写类实现Callable接口,通过FutureTask创建
 2、启动线程
 调用线程对象的start()方法
 start()方法的作用:启动一个分支线程,在JVM中开辟一个新的栈空间
 run()方法不会启动线程,不会分配新的分支线程栈
 */
public class ThreadNewByExtend {
    public static void main(String[] args) {
        // 这里是main方法,这属于主线程,在主栈中运行

        // 新建一个分支线程对象
        Mythread t = new Mythread();
        /**
         * run()方法不会启动线程,不会分配新的分支栈(只调用run()不调用start()还是单线程)
         * 会先执行 t 线程的 for循环,再执行 主线程main中的for循环
         * */
        //t.run();

        /**
         * start()方法的作用:启动一个分支线程,在JVM中开辟一个新的栈空间,这段代码任务完成之后,瞬间就结束了
         * start()方法只是为了开启一个新的栈空间,只要新的栈空间开出来,start()方法就结束了,线程就启动成功了
         * 启动成功的线程会自动调用run方法,并且run方法在分支栈的栈底部(压栈)
         * run方法在分支栈的栈底部,main方法在主栈的栈底部;分支线程run和 主线程main是平级的
         * */
        t.start();

        //主线程for循环
        for (int i = 1;i <= 100;i++){
            System.out.println("main----" + i);
        }
    }
}

class Mythread extends Thread {
    //Ctrl+O
    @Override
    public void run() {
        for (int i = 1;i <= 100;i++){
            System.out.println("Mythread----" + i);
        }
    }
}
2、实现java.lang.Runnable接口
/**
 编写一个类实现java.lang.Runnable接口
 */
public class ThreadNewByRunnable {
    public static void main(String[] args) {
        MyRunnable runnable = new MyRunnable();
        Thread t = new Thread(runnable);
        t.start();

        //采用匿名内部类方式
        Thread t1 = new Thread(new Runnable() {
            @Override
            public void run() {
                for (int i = 1;i <= 100;i++){
                    System.out.println("分支线程t1----" + i);
                }
            }
        });
        t1.start();

        //主线程for循环
        for (int i = 1;i <= 100;i++){
            System.out.println("main----" + i);
        }
    }
}

class MyRunnable implements Runnable{

    @Override
    public void run() {
        for (int i = 1;i <= 100;i++){
            System.out.println("分支线程t----" + i);
        }
    }
}
3、编写类实现Callable接口,通过FutureTask创建(JDK8新特性)
import java.util.concurrent.Callable;
import java.util.concurrent.ExecutionException;
import java.util.concurrent.FutureTask;

/**
实现线程的第三种方式:
    实现Callable接口
    优点:可以获取到线程的执行结果
    缺点:效率比较低,在获取t线程执行结果的时候,当前线程受阻塞,效率较低
 */
public class ThreadNewByCallable {
    public static void main(String[] args) {

        // 创建一个“未来任务类”对象,参数:Callable接口实现类对象
        FutureTask task = new FutureTask(new Callable() {
            @Override
            // call()方法就相当于run方法,这个方法有返回值
            public Object call() throws Exception {
                System.out.println("call begin");
                Thread.sleep(1000 * 5);
                System.out.println("call end");

                return 100+50;
            }
        });

        Thread t = new Thread(task);
        t.setName("t");
        t.start();

        try {
            // get()方法获取t线程的返回结果,但是会导致“当前线程阻塞”
            Object obj = task.get();
            System.out.println("线程执行结果:" + obj);
        } catch (InterruptedException e) {
            e.printStackTrace();
        } catch (ExecutionException e) {
            e.printStackTrace();
        }

        // main方法这里的程序要想执行必须等待get()方法的结束,而get()方法可能需要很久
        // get()方法是为了拿另一个线程的执行结果
        System.out.println("Hello World!");
    }
}
二、sleep()和wait()方法
1、sleep是Thread类的静态方法;wait是Object的方法
sleep的作用是让线程休眠指定的时间,在时间到达时恢复,也就是说sleep将在指定时间到达时恢复线程执行(进入“阻塞状态”,放弃占有CPU时间片,让给其它线程使用)
wait是可以对任意一个对象调用wait方法,调用wait方法将会将调用者的线程挂起,直到其他线程调用同一个对象的notify()方法才会重新激活调用者
2、sleep方法没有释放锁,而wait方法释放了锁
3、wait,notify和notifyAll只能在同步代码块里使用,而sleep可以在任何地方使用
synchronized(x){
    x.wait();
}
4、sleep和wait都需要捕获InterruptedException异常
在JUC中使用sleep() 方法如下
// NANOSECONDS、MICROSECONDS、MILLISECONDS、SECONDS、MINUTES、HOURS、DAYS 等睡眠时间

// 如下,睡眠2秒
TimeUnit.SECONDS.sleep(2);
三、synchronized和Lock
请参考
Java--多线程之synchronized和lock;死锁(四)_MinggeQingchun的博客-CSDN博客
(一)synchronized
synchronized是Java中的关键字,被Java原生支持,是一种最基本的同步锁
synchronized修饰的对象有以下几种:
1、修饰一个代码块,被修饰的代码块称为同步语句块,其作用的范围是大括号{}括起来的代码,作用的对象是调用这个代码块的对象2、修饰一个方法,被修饰的方法称为同步方法,其作用的范围是整个方法,作用的对象是调用这个方法的对象
3、修改一个静态的方法,其作用的范围是整个静态方法,作用的对象是这个类的所有对象
4、修改一个类,其作用的范围是synchronized后面括号括起来的部分,作用主的对象是这个类的所有对象
this VS class
1、加锁 this 时,表示用当前的对象进行加锁,每个对象都对应了一把锁
普通的同步方法 锁的调用者,如 this对象,obj对象; Object obj = new Object();
2、加锁 xx.class 时,表示使用某个类(而非类实例)来加锁,它是应用程序级别的,是全局生效的
静态的同步方法 锁的是 Class 类模板(.class文件;一个类只有唯一的一份.class文件)
synchronized()执行原理
1、假设t1和t2线程并发,开始执行代码时,有一个先后顺序
2、假设t1先执行,遇到了synchronized,t1自动找“共享对象”的对象锁, 找到之后并占有这把锁,然后执行同步代码块中的程序,在程序执行过程中一直 占有这把锁,直到同步代码块代码结束,这把锁才会释放
3、假设t1已经占有这把锁,此时t2也遇到synchronized关键字,也会去占有 共享对象的这把锁,结果这把锁被t1占有,t2只能在同步代码块外面等待t1的结束, 直到t1把同步代码块执行结束了,t1会归还这把锁,此时t2终于等到这把锁,然后 t2占有这把锁之后,进入同步代码块执行程序
/**
* 真正的多线程开发,公司中的开发,降低耦合性
* 线程就是一个单独的资源类,没有任何附属的操作!
*/
public class SaleTicketSynchronized {
public static void main(String[] args) {
// 并发:多线程操作同一个资源类, 把资源类丢入线程
Ticket ticket = new Ticket();
// @FunctionalInterface 函数式接口,jdk1.8 lambda表达式 (参数)->{ 代码 }
new Thread(()->{
for (int i = 1; i < 40 ; i++) {
ticket.sale();
}
},"A").start();
new Thread(()->{
for (int i = 1; i < 40 ; i++) {
ticket.sale();
}
},"B").start();
new Thread(()->{
for (int i = 1; i < 40 ; i++) {
ticket.sale();
}
},"C").start();
}
}
// 资源类 OOP
class Ticket {
// 属性、方法
private int number = 30;
// 卖票的方式
// synchronized 本质: 队列,锁
public synchronized void sale(){
if (number>0){
System.out.println(Thread.currentThread().getName()+"卖出了第"+(number--)+"票,剩余:"+number);
}
}
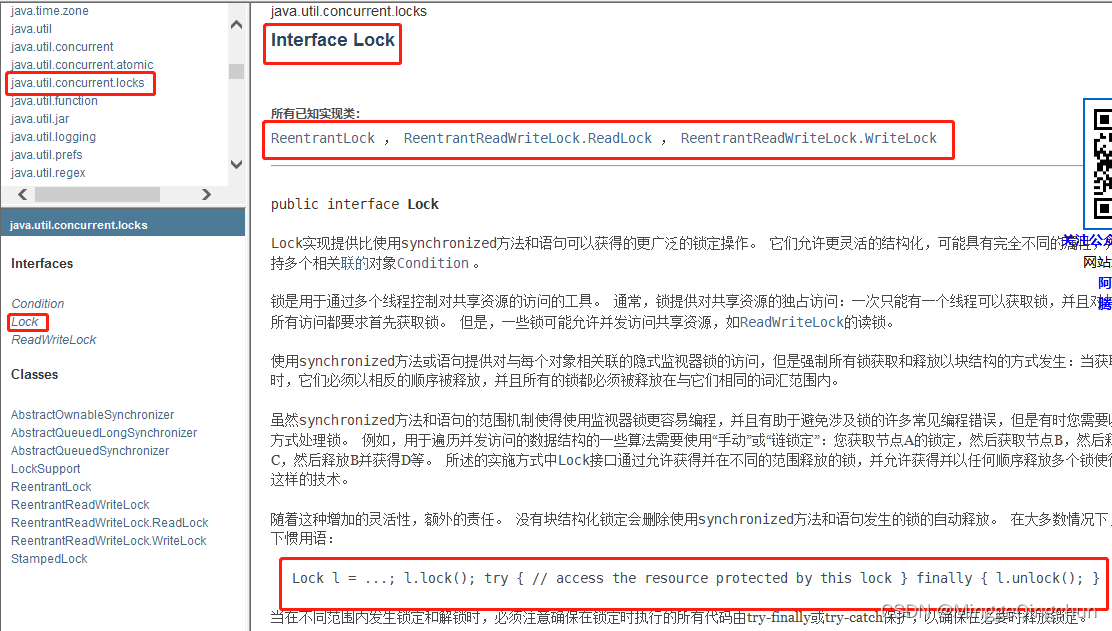
}(二)Lock
从JDK 5.0开始,Java提供了更强大的线程同步机制一通过 显式定义同步锁对象来实现同步。同步锁使用L ock对象充当
java.util.concurrent.locks.Lock接口是控制多个线程对共享资源进行访问的工具
import java.util.concurrent.locks.Lock;
import java.util.concurrent.locks.ReentrantLock;

public class SaleTicketLock {
    public static void main(String[] args) {
        // 并发:多线程操作同一个资源类, 把资源类丢入线程
        Ticket2 ticket = new Ticket2();

        // @FunctionalInterface 函数式接口,jdk1.8  lambda表达式 (参数)->{ 代码 }
        new Thread(()->{for (int i = 1; i < 40 ; i++) ticket.sale();},"A").start();
        new Thread(()->{for (int i = 1; i < 40 ; i++) ticket.sale();},"B").start();
        new Thread(()->{for (int i = 1; i < 40 ; i++) ticket.sale();},"C").start();
    }
}

// Lock三步
// 1、 new ReentrantLock();
// 2、 lock.lock(); // 加锁
// 3、 finally => lock.unlock(); // 解锁
class Ticket2 {
    // 属性、方法
    private int number = 30;

    Lock lock = new ReentrantLock();

    public void sale(){
        lock.lock(); // 加锁
        try {
            // 业务代码
            if (number>0){
                System.out.println(Thread.currentThread().getName()+"卖出了第"+(number--)+"票,剩余:"+number);
            }
        } catch (Exception e) {
            e.printStackTrace();
        } finally {
            lock.unlock(); // 解锁
        }
    }
}
(三) Synchronized与Lock的区别
1、Lock是一个接口;synchronized是Java内置的关键字
2、Lock可以判断是否获取到了锁;synchronized无法判断获取锁的状态
3、Lock是显式锁,必须手动关闭锁(手动开启和关闭锁,忘记关闭锁会导致 死锁) ;synchronized是隐式锁,会自动释放锁,出了作用域自动释放
4、Lock只有代码块锁,适合大量同步代码块;synchronized有代码块锁和方法锁,适合少量代码
5、使用Lock锁,JVM将花费较少的时间来调度线程,性能更好,不一定会导致线程排队等待阻塞。并且具有更好的扩展性(提供更多的子类);synchronized会导致线程排队等待阻塞
6、Lock 可重入锁,可以判断锁状态,非公平;synchronized 可重入锁,不可中断,非公平
使用优先顺序
Lock > 同步代码块(已经进入了方法体,分配了相应资源) > 同步方法(在方法体之外)
四、生产者和消费者模式
可参考
Java--多线程之生产者消费者模式;线程池ExecutorService(五)_MinggeQingchun的博客-CSDN博客
生产者消费者模式是通过一个容器来解决生产者和消费者的强耦合问题。生产者和消费者彼此之间不直接通讯,而通过阻塞队列来进行通讯,所以生产者生产完数据之后不用等待消费者处理,直接扔给阻塞队列,消费者不找生产者要数据,而是直接从阻塞队列里取,阻塞队列就相当于一个缓冲区,平衡了生产者和消费者的处理能力
Java中生产者消费者模式主要使用wait()方法和notify()方法
| 方法名 | 作用 |
| wait() | 表示线程一直等待,直到其他线程通知,与sleep不同,会释放锁 |
| wait(long timeout) | 指定等待的毫秒数 |
| notify() | 唤醒一个处于等待状态的线程;不会释放占有的锁 |
| notifyAl() | 唤醒同一个对象上所有调用wait()方法的线程,优先级比较高的线程优先调度 |
(一)生产者和消费者 使用Synchronized
使用if
/**
 * 生产者消费者模式
 * A、B线程负责生产 number + 1;C、D线程负责生产 number - 1;
 */
public class PC1Synchronized {
    public static void main(String[] args) {
        TNumber tNumber = new TNumber();
        int num = 10;

        new Thread(() -> {
            for (int i = 0; i < num; i++) {
                try {
                    tNumber.increment();
                } catch (InterruptedException e) {
                    e.printStackTrace();
                }
            }
        },"A").start();

        new Thread(() -> {
            for (int i = 0; i < num; i++) {
                try {
                    tNumber.decrement();
                } catch (InterruptedException e) {
                    e.printStackTrace();
                }
            }
        },"B").start();

        new Thread(() -> {
            for (int i = 0; i < num; i++) {
                try {
                    tNumber.increment();
                } catch (InterruptedException e) {
                    e.printStackTrace();
                }
            }
        },"C").start();

        new Thread(() -> {
            for (int i = 0; i < num; i++) {
                try {
                    tNumber.decrement();
                } catch (InterruptedException e) {
                    e.printStackTrace();
                }
            }
        },"D").start();
    }
}

class TNumber {
    private int number = 0;

    // 生产
    public synchronized void increment() throws InterruptedException {
        if/*while*/ (number != 0){
            // 等待
            this.wait();
        }

        // 开始生产
        number++;
        System.out.println(Thread.currentThread().getName() + "生产了---->" + number);
        this.notify();
    }

    // 消费
    public synchronized void decrement() throws InterruptedException {
        if/*while*/ (number == 0){
            this.wait();
        }

        number--;
        System.out.println(Thread.currentThread().getName() + "消费了---->" + number);
        this.notify();
    }
}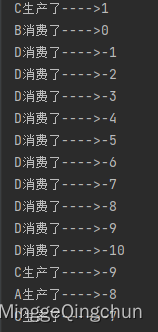
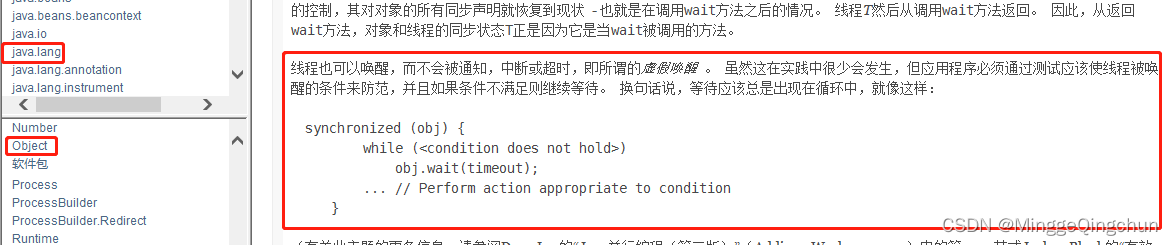
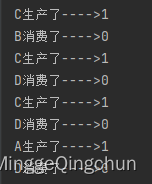
线程虚假唤醒!!!
如果使用 if 判断 会出一个问题,线程虚假唤醒
线程也可以唤醒,而不会被通知,中断或超时,即所谓的虚假唤醒 。 虽然这在实践中很少会发生,但应用程序必须通过测试应该使线程被唤醒的条件来防范,并且如果条件不满足则继续等待。 换句话说,等待应该总是出现在循环中,就像这样
synchronized (obj) {
      while (<condition does not hold>)
          obj.wait(timeout);
      ... // Perform action appropriate to condition
}
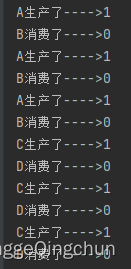
使用while
/**
 * 生产者消费者模式
 * A、B线程负责生产 number + 1;C、D线程负责生产 number - 1;
 */
public class PC2Synchronized {
    public static void main(String[] args) {
        TNumber2 tNumber = new TNumber2();
        int num = 10;

        new Thread(() -> {
            for (int i = 0; i < num; i++) {
                try {
                    tNumber.increment();
                } catch (InterruptedException e) {
                    e.printStackTrace();
                }
            }
        },"A").start();

        new Thread(() -> {
            for (int i = 0; i < num; i++) {
                try {
                    tNumber.decrement();
                } catch (InterruptedException e) {
                    e.printStackTrace();
                }
            }
        },"B").start();

        new Thread(() -> {
            for (int i = 0; i < num; i++) {
                try {
                    tNumber.increment();
                } catch (InterruptedException e) {
                    e.printStackTrace();
                }
            }
        },"C").start();

        new Thread(() -> {
            for (int i = 0; i < num; i++) {
                try {
                    tNumber.decrement();
                } catch (InterruptedException e) {
                    e.printStackTrace();
                }
            }
        },"D").start();
    }
}

class TNumber2 {
    private int number = 0;

    // 生产
    public synchronized void increment() throws InterruptedException {
        while (number != 0){
            // 等待
            this.wait();
        }

        // 开始生产
        number++;
        System.out.println(Thread.currentThread().getName() + "生产了---->" + number);
        this.notify();
    }

    // 消费
    public synchronized void decrement() throws InterruptedException {
        while (number == 0){
            this.wait();
        }

        number--;
        System.out.println(Thread.currentThread().getName() + "消费了---->" + number);
        this.notify();
    }
} 
(二)生产者和消费者 使用Lock、Condition
任意一个Java对象,都拥有一组监视器方法(定义在),主要包括wait,notify,notifyAll方法,这些方法与synchornized关键字相配合,可以实现等待/通知模式
Condition接口也提供了类似的Object的监视器方法,与Lock配合可以实现等待/通知模式
Condition是在java 1.5中才出现的,它用来替代传统的Object的wait()、notify()实现线程间的协作,
相比使用Object的wait()、notify(),使用Condition的await()、signal()这种方式实现线程间协作更加安全和高效
Conditon中的await()对应Object的wait();
Condition中的signal()对应Object的notify();
Condition中的signalAll()对应Object的notifyAll()
通常来说,线程通信的实现比较推荐使用Condition
1、Condition是个接口,基本的方法就是await()和signal()方法
2、Condition依赖于Lock接口,生成一个Condition的基本代码是lock.newCondition()
3、调用Condition的await()和signal()方法,都必须在lock保护之内,就是说必须在lock.lock()和lock.unlock之间才可以使用,因为内部会做释放锁的操作,如果不是在lock和unlock之间使用,会报错 java.lang.IllegalMonitorStateException
/**
 * 生产者消费者模式
 * A、B线程负责生产 number + 1;C、D线程负责生产 number - 1;
 */
public class PC3LockCondition {
    public static void main(String[] args) {
        TNumber3 tNumber = new TNumber3();
        int num = 10;

        new Thread(() -> {
            for (int i = 0; i < num; i++) {
                try {
                    tNumber.increment();
                } catch (InterruptedException e) {
                    e.printStackTrace();
                }
            }
        },"A").start();

        new Thread(() -> {
            for (int i = 0; i < num; i++) {
                try {
                    tNumber.decrement();
                } catch (InterruptedException e) {
                    e.printStackTrace();
                }
            }
        },"B").start();

        new Thread(() -> {
            for (int i = 0; i < num; i++) {
                try {
                    tNumber.increment();
                } catch (InterruptedException e) {
                    e.printStackTrace();
                }
            }
        },"C").start();

        new Thread(() -> {
            for (int i = 0; i < num; i++) {
                try {
                    tNumber.decrement();
                } catch (InterruptedException e) {
                    e.printStackTrace();
                }
            }
        },"D").start();
    }
}

class TNumber3 {
    private int number = 0;

    Lock lock = new ReentrantLock();
    Condition condition = lock.newCondition();

    //condition.await(); // 等待
    //condition.signalAll(); // 唤醒全部

    // 生产
    public void increment() throws InterruptedException {
        lock.lock();

        try{
            while (number != 0){
                // 等待
                condition.await();
            }

            // 开始生产
            number++;
            System.out.println(Thread.currentThread().getName() + "生产了---->" + number);
            condition.signalAll();
        }finally {
            lock.unlock();
        }
    }

    // 消费
    public void decrement() throws InterruptedException {
        lock.lock();
        try{
            while (number == 0){
                condition.await();
            }

            number--;
            System.out.println(Thread.currentThread().getName() + "消费了---->" + number);
            condition.signalAll();
        }finally {
            lock.unlock();
        }
    }
}
(三)生产者和消费者 使用Lock、Condition精准通知和唤醒线程
上述代码中也会存在一个小缺陷,如 我们想按照 A --> B --> C --> D -> A 的线程执行顺序
/**
 * 生产者消费者模式
 * A 执行完调用B,B执行完调用C,C执行完调用D,D执行完调用A
 */
public class PC4LockCondition {
    public static void main(String[] args) {
        TNumber4 tNumber = new TNumber4();
        int num = 10;

        new Thread(() -> {
            for (int i = 0; i < num; i++) {
                try {
                    tNumber.methodA();
                } catch (InterruptedException e) {
                    e.printStackTrace();
                }
            }
        },"A").start();

        new Thread(() -> {
            for (int i = 0; i < num; i++) {
                try {
                    tNumber.methodB();
                } catch (InterruptedException e) {
                    e.printStackTrace();
                }
            }
        },"B").start();

        new Thread(() -> {
            for (int i = 0; i < num; i++) {
                try {
                    tNumber.methodC();
                } catch (InterruptedException e) {
                    e.printStackTrace();
                }
            }
        },"C").start();

        new Thread(() -> {
            for (int i = 0; i < num; i++) {
                try {
                    tNumber.methodD();
                } catch (InterruptedException e) {
                    e.printStackTrace();
                }
            }
        },"D").start();
    }
}

class TNumber4 {
    private int number = 1;

    Lock lock = new ReentrantLock();
    Condition conditionA = lock.newCondition();
    Condition conditionB = lock.newCondition();
    Condition conditionC = lock.newCondition();
    Condition conditionD = lock.newCondition();

    //condition.await(); // 等待
    //condition.signalAll(); // 唤醒全部

    public void methodA() throws InterruptedException {
        lock.lock();

        try{
            while (number != 1){
                // 等待
                conditionA.await();
            }
            System.out.println(Thread.currentThread().getName());

            number = 2;
            // 唤醒,唤醒指定的线程 B
            conditionB.signal();
        }finally {
            lock.unlock();
        }
    }

    // 消费
    public void methodB() throws InterruptedException {
        lock.lock();
        try{
            while (number != 2){
                conditionB.await();
            }

            System.out.println(Thread.currentThread().getName());

            number = 3;
            // 唤醒,唤醒指定的线程 C
            conditionC.signal();
        }finally {
            lock.unlock();
        }
    }

    public void methodC() throws InterruptedException {
        lock.lock();

        try{
            while (number != 3){
                // 等待
                conditionC.await();
            }
            System.out.println(Thread.currentThread().getName());

            number = 4;
            // 唤醒,唤醒指定的线程 D
            conditionD.signal();
        }finally {
            lock.unlock();
        }
    }

    // 消费
    public void methodD() throws InterruptedException {
        lock.lock();
        try{
            while (number != 4){
                conditionD.await();
            }
            System.out.println(Thread.currentThread().getName());

            number = 1;
            // 唤醒,唤醒指定的线程 A
            conditionA.signal();
        }finally {
            lock.unlock();
        }
    }
}