【cloud Alibaba】(四)分布式事务处理——Seata

各位小伙伴们大家好,欢迎来到这个小扎扎的spring cloud专栏,在这个系列专栏中我对B站尚硅谷阳哥的spring cloud教程进行一个总结,鉴于 看到就是学到、学到就是赚到 精神,这波依然是血赚 ┗|`O′|┛
💡Seata知识点速览
- 🍹 Seata
- 🍸 Seata是什么
- 🍸 一加三概念
- 🍹 Seata的使用
- 🍸 下载安装
- 🍸 官网案例上手
- 🍷 数据库数据准备
- 🍷 订单模块
🍹 Seata
🍸 Seata是什么
Seata 是一款开源的分布式事务解决方案,致力于提供高性能和简单易用的分布式事务服务。Seata 将为用户提供了 AT、TCC、SAGA 和 XA 事务模式,为用户打造一站式的分布式解决方案。
🍸 一加三概念
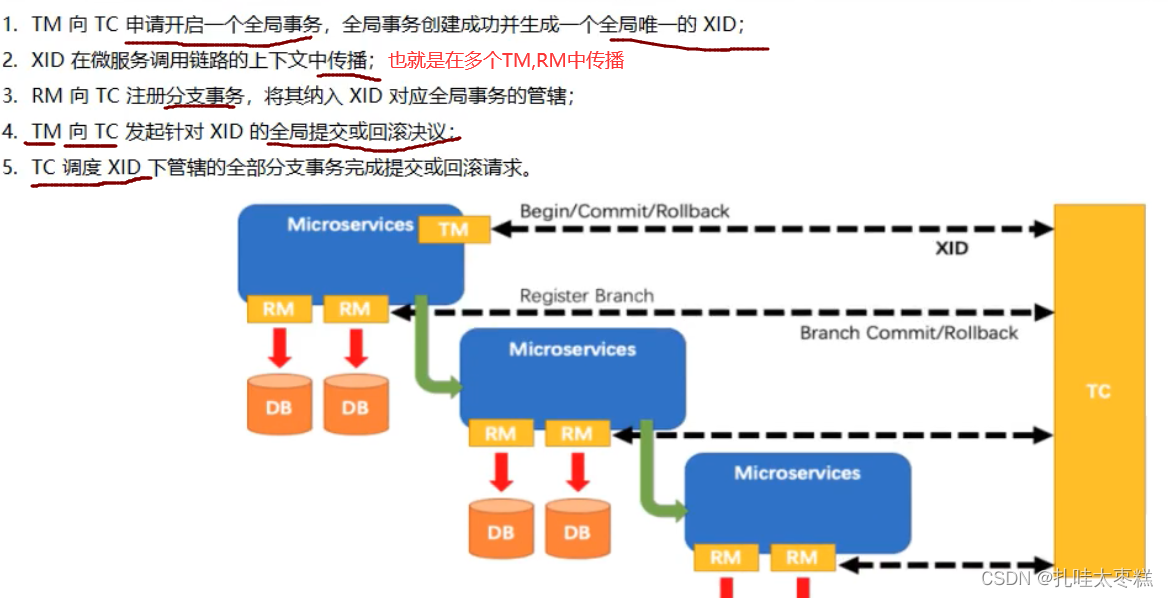
所谓的一加三就是一个唯一ID加三个组件模型。
一个ID
- Transaction lD XID,也就是全局唯一的事务ID,XID相同的所有操作被认为是同一个事务
三个组件
- Transaction Coordinator(TC)——事务协调器,维护全局事务的运行状态,负责协调并驱动全局事务提交或回滚。
- Transaction Manager(TM)——事务管理器,定义全局事务的范围:开始全局事务、提交或回滚全局事务。
- Resource Manager(RM)——资源管理器,管理分支事务工作的资源,与 TC 对话以注册分支事务和报告分支事务的状态,并驱动分支事务提交或回滚。
一加三模式的运作流程图如下
🍹 Seata的使用
🍸 下载安装
下载地址:https://github.com/seata/seata/releases找到合适的版本点击binary下载即可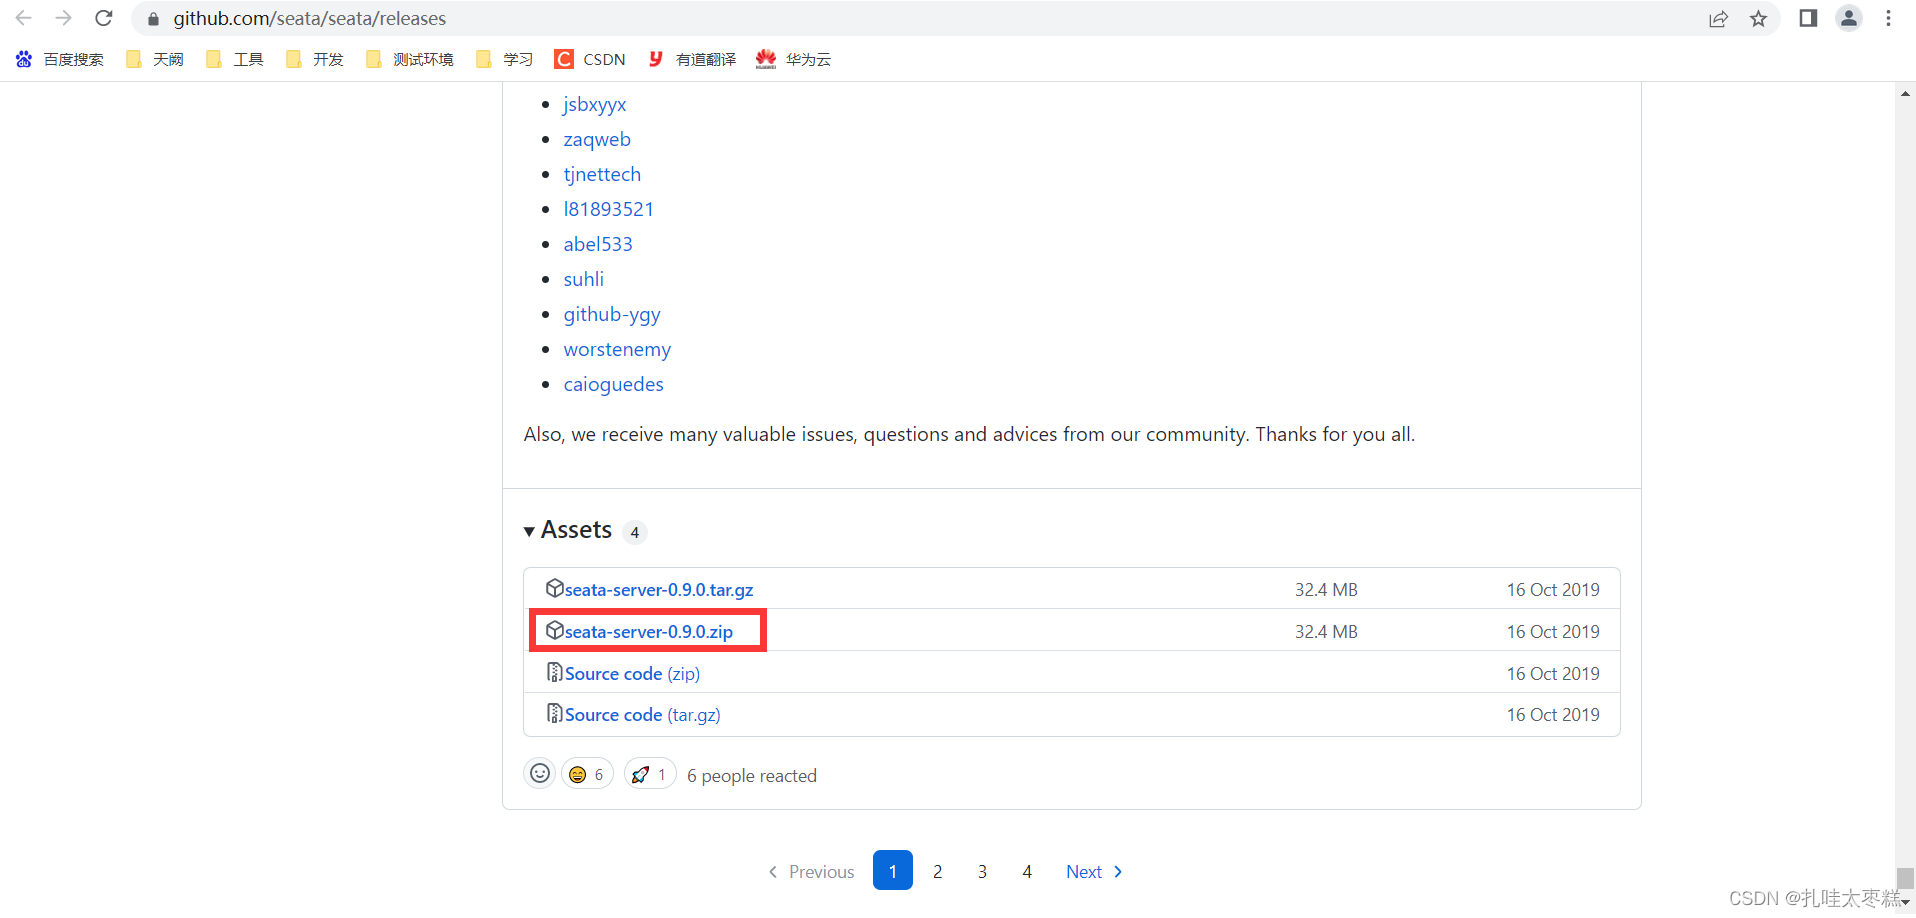
解压缩zip压缩包,修改conf目录下的file.conf配置文件,主要是三个地方:service、store的mode、store的db配置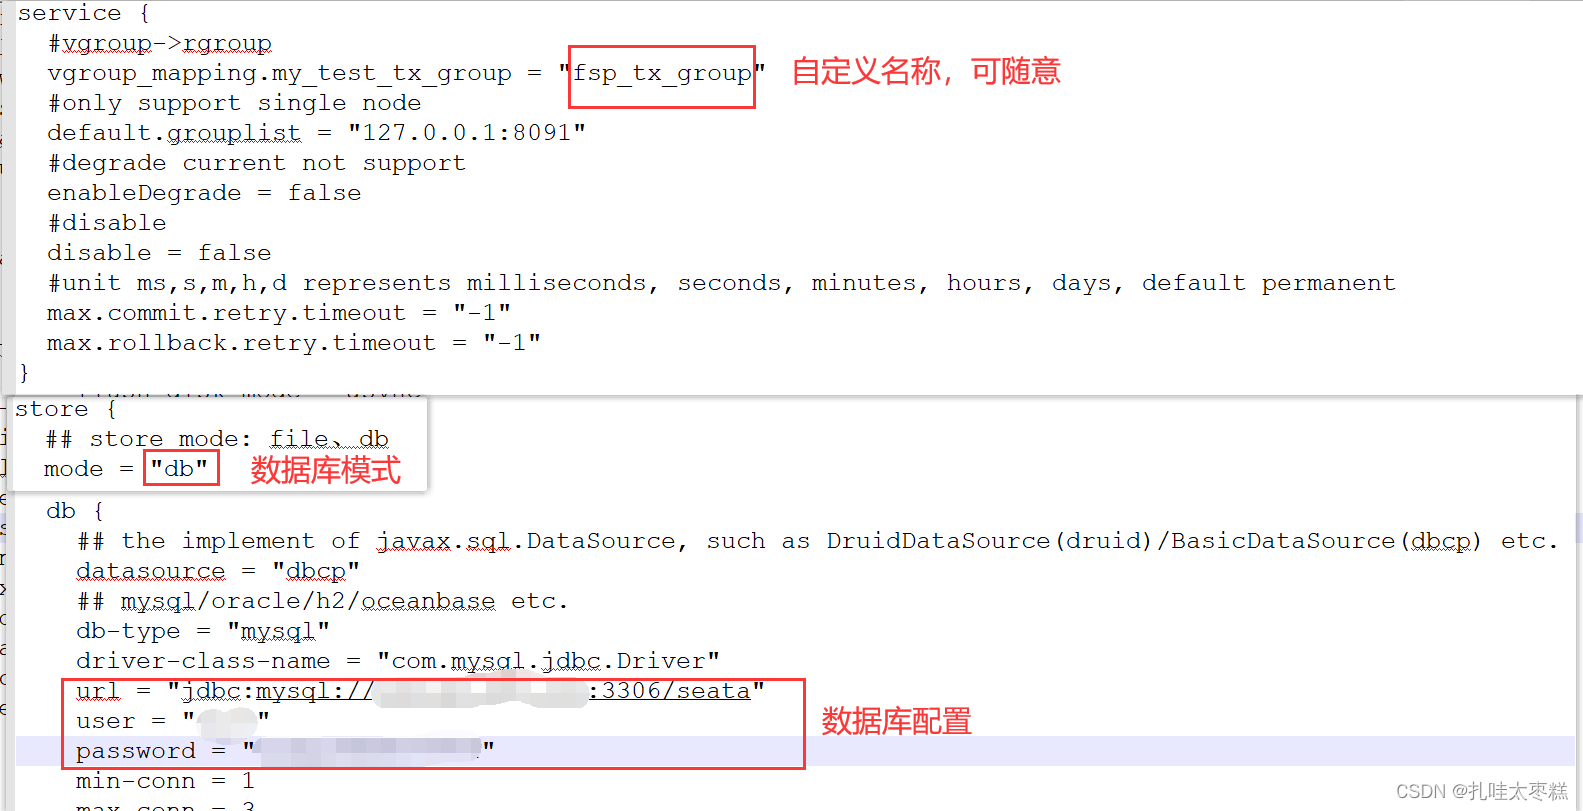
修改配置之后根据配置信息去数据库创建相应的数据库seata,执行conf文件下的db_store.sql文件生成表数据。然后修改conf目录下的registry.conf文件,让seata注册进nacos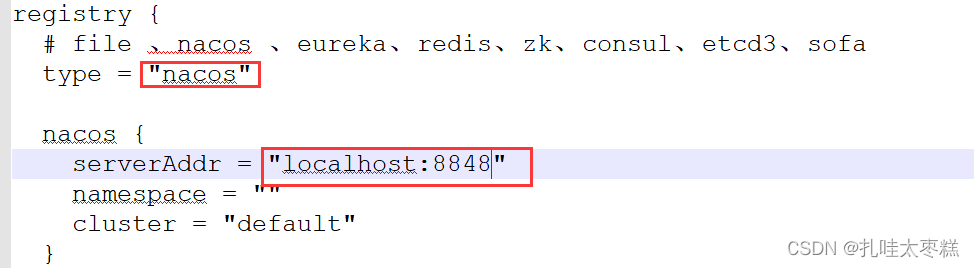
🍸 官网案例上手
这里我们会创建三个服务,一个订单服务,一个库存服务,一个账户服务。
当用户下单时,会在订单服务中创建一个订单,然后通过远程调用库存服务来扣减下单商品的库存,再通过远程调用账户服务来扣减用户账户里面的余额,最后在订单服务中修改订单状态为已完成。
该操作跨越三个数据库,有两次远程调用,很明显会有分布式事务问题。
🍷 数据库数据准备
三个数据库六张表,每个数据库中都有一张业务表和回滚日志表
CREATE DATABASE seata_order;
USE seata_order;
CREATE TABLE t_order(
id BIGINT(11) NOT NULL AUTO_INCREMENT PRIMARY KEY ,
user_id BIGINT(11) DEFAULT NULL COMMENT '用户id',
product_id BIGINT(11) DEFAULT NULL COMMENT '产品id',
count INT(11) DEFAULT NULL COMMENT '数量',
money DECIMAL(11,0) DEFAULT NULL COMMENT '金额',
status INT(1) DEFAULT NULL COMMENT '订单状态:0创建中,1已完结'
)ENGINE=InnoDB AUTO_INCREMENT=7 CHARSET=utf8;
CREATE TABLE `undo_log` (
`id` bigint(20) NOT NULL AUTO_INCREMENT,
`branch_id` bigint(20) NOT NULL,
`xid` varchar(100) NOT NULL,
`context` varchar(128) NOT NULL,
`rollback_info` longblob NOT NULL,
`log_status` int(11) NOT NULL,
`log_created` datetime NOT NULL,
`log_modified` datetime NOT NULL,
`ext` varchar(100) DEFAULT NULL,
PRIMARY KEY (`id`),
UNIQUE KEY `ux_undo_log` (`xid`,`branch_id`)
) ENGINE=InnoDB AUTO_INCREMENT=1 DEFAULT CHARSET=utf8;
CREATE DATABASE seata_storage;
USE seata_storage;
CREATE TABLE t_storage(
id BIGINT(11) NOT NULL AUTO_INCREMENT PRIMARY KEY ,
product_id BIGINT(11) DEFAULT NULL COMMENT '产品id',
total INT(11) DEFAULT NULL COMMENT '总库存',
used INT(11) DEFAULT NULL COMMENT '已用库存',
residue INT(11) DEFAULT NULL COMMENT '剩余库存'
)ENGINE=InnoDB AUTO_INCREMENT=7 CHARSET=utf8;
INSERT INTO t_storage(id, product_id, total, used, residue) VALUES(1,1,100,0,100);
CREATE TABLE `undo_log` (
`id` bigint(20) NOT NULL AUTO_INCREMENT,
`branch_id` bigint(20) NOT NULL,
`xid` varchar(100) NOT NULL,
`context` varchar(128) NOT NULL,
`rollback_info` longblob NOT NULL,
`log_status` int(11) NOT NULL,
`log_created` datetime NOT NULL,
`log_modified` datetime NOT NULL,
`ext` varchar(100) DEFAULT NULL,
PRIMARY KEY (`id`),
UNIQUE KEY `ux_undo_log` (`xid`,`branch_id`)
) ENGINE=InnoDB AUTO_INCREMENT=1 DEFAULT CHARSET=utf8;
CREATE DATABASE seata_account;
USE seata_account;
CREATE TABLE t_account(
id BIGINT(11) NOT NULL AUTO_INCREMENT PRIMARY KEY ,
user_id BIGINT(11) DEFAULT NULL COMMENT '用户id',
total DECIMAL(10,0) DEFAULT NULL COMMENT '总额度',
used DECIMAL(10,0) DEFAULT NULL COMMENT '已用额度',
residue DECIMAL(10,0) DEFAULT 0 COMMENT '剩余可用额度'
)ENGINE=InnoDB AUTO_INCREMENT=7 CHARSET=utf8;
INSERT INTO t_account(id, user_id, total, used, residue) VALUES(1,1,1000,0,1000);
CREATE TABLE `undo_log` (
`id` bigint(20) NOT NULL AUTO_INCREMENT,
`branch_id` bigint(20) NOT NULL,
`xid` varchar(100) NOT NULL,
`context` varchar(128) NOT NULL,
`rollback_info` longblob NOT NULL,
`log_status` int(11) NOT NULL,
`log_created` datetime NOT NULL,
`log_modified` datetime NOT NULL,
`ext` varchar(100) DEFAULT NULL,
PRIMARY KEY (`id`),
UNIQUE KEY `ux_undo_log` (`xid`,`branch_id`)
) ENGINE=InnoDB AUTO_INCREMENT=1 DEFAULT CHARSET=utf8;
🍷 订单模块
第一步: 引入相关依赖
<dependencies>
    <!--nacos-->
    <dependency>
        <groupId>com.alibaba.cloud</groupId>
        <artifactId>spring-cloud-starter-alibaba-nacos-discovery</artifactId>
    </dependency>
    <!--seata-->
    <dependency>
        <groupId>com.alibaba.cloud</groupId>
        <artifactId>spring-cloud-starter-alibaba-seata</artifactId>
        <exclusions>
            <exclusion>
                <artifactId>seata-all</artifactId>
                <groupId>io.seata</groupId>
            </exclusion>
        </exclusions>
    </dependency>
    <dependency>
        <groupId>io.seata</groupId>
        <artifactId>seata-all</artifactId>
        <version>0.9.0</version>
    </dependency>
    <!--feign-->
    <dependency>
        <groupId>org.springframework.cloud</groupId>
        <artifactId>spring-cloud-starter-openfeign</artifactId>
    </dependency>
    <!--web-actuator-->
    <dependency>
        <groupId>org.springframework.boot</groupId>
        <artifactId>spring-boot-starter-web</artifactId>
    </dependency>
    <dependency>
        <groupId>org.springframework.boot</groupId>
        <artifactId>spring-boot-starter-actuator</artifactId>
    </dependency>
    <!--mysql-druid-->
    <dependency>
        <groupId>mysql</groupId>
        <artifactId>mysql-connector-java</artifactId>
        <version>5.1.37</version>
    </dependency>
    <dependency>
        <groupId>com.alibaba</groupId>
        <artifactId>druid-spring-boot-starter</artifactId>
        <version>1.1.10</version>
    </dependency>
    <dependency>
        <groupId>org.mybatis.spring.boot</groupId>
        <artifactId>mybatis-spring-boot-starter</artifactId>
        <version>2.0.0</version>
    </dependency>
    <dependency>
        <groupId>org.springframework.boot</groupId>
        <artifactId>spring-boot-starter-test</artifactId>
        <scope>test</scope>
    </dependency>
    <dependency>
        <groupId>org.projectlombok</groupId>
        <artifactId>lombok</artifactId>
        <optional>true</optional>
    </dependency>
</dependencies>
第二步: 配置文件
application.yml(最重要的就是tx-service-group配置)
server:
  port: 2001

spring:
  application:
    name: seata-order-service
  cloud:
    alibaba:
      seata:
        tx-service-group: fsp_tx_group #自定义事务组名称需要与seata-server中的对应
    nacos:
      discovery:
        server-addr: localhost:8848
  datasource:
    type: com.alibaba.druid.pool.DruidDataSource
    driver-class-name: org.gjt.mm.mysql.Driver
    url: jdbc:mysql://localhost:3306/seata_order?useUnicode=true&characterEncoding=utf-8&useSSL=false
    username: root
    password: root

feign:
  hystrix:
    enabled: false

logging:
  level:
    io:
      seata: info

mybatis:
  mapperLocations: classpath:mapper/*.xml
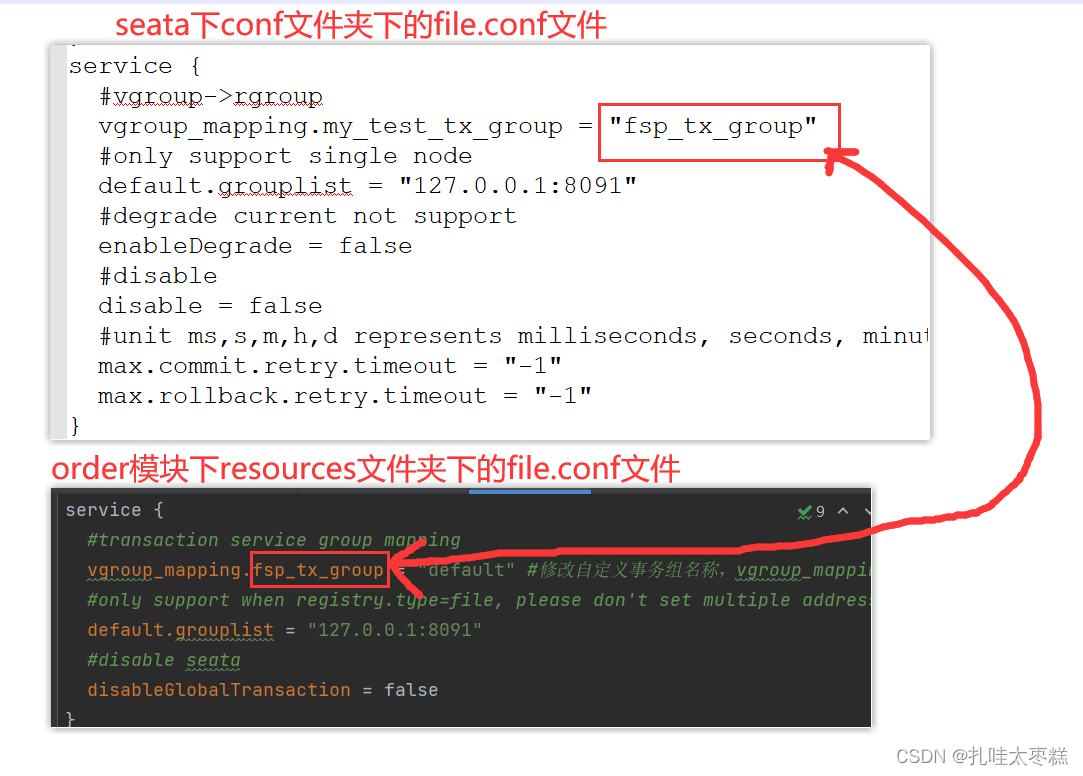
file.conf(service和db模块的修改)
service {
  #transaction service group mapping
  vgroup_mapping.fsp_tx_group = "default" #修改自定义事务组名称,vgroup_mapping.fsp_tx_group保证和seatafile.conf中的my_test_tx_group名一致
  #only support when registry.type=file, please don't set multiple addresses
  default.grouplist = "127.0.0.1:8091"
  #disable seata
  disableGlobalTransaction = false
}

## transaction log store, only used in seata-server
store {
  ## store mode: file、db
  mode = "db"

  ## file store property
  file {
    ## store location dir
    dir = "sessionStore"
  }

  ## database store property
  db {
    ## the implement of javax.sql.DataSource, such as DruidDataSource(druid)/BasicDataSource(dbcp) etc.
    datasource = "dbcp"
    ## mysql/oracle/h2/oceanbase etc.
    db-type = "mysql"
    driver-class-name = "com.mysql.jdbc.Driver"
    url = "数据库"
    user = "数据库名"
    password = "密码"
  }
}
registry.conf(注册进nacos)
registry {
  # file 、nacos 、eureka、redis、zk、consul、etcd3、sofa
  type = "nacos"

  nacos {
    serverAddr = "localhost:8848"
    namespace = ""
    cluster = "default"
  }
  eureka {
    serviceUrl = "http://localhost:8761/eureka"
    application = "default"
    weight = "1"
  }
  redis {
    serverAddr = "localhost:6379"
    db = "0"
  }
  zk {
    cluster = "default"
    serverAddr = "127.0.0.1:2181"
    session.timeout = 6000
    connect.timeout = 2000
  }
  consul {
    cluster = "default"
    serverAddr = "127.0.0.1:8500"
  }
  etcd3 {
    cluster = "default"
    serverAddr = "http://localhost:2379"
  }
  sofa {
    serverAddr = "127.0.0.1:9603"
    application = "default"
    region = "DEFAULT_ZONE"
    datacenter = "DefaultDataCenter"
    cluster = "default"
    group = "SEATA_GROUP"
    addressWaitTime = "3000"
  }
  file {
    name = "file.conf"
  }
}

config {
  # file、nacos 、apollo、zk、consul、etcd3
  type = "file"

  nacos {
    serverAddr = "localhost"
    namespace = ""
  }
  consul {
    serverAddr = "127.0.0.1:8500"
  }
  apollo {
    app.id = "seata-server"
    apollo.meta = "http://192.168.1.204:8801"
  }
  zk {
    serverAddr = "127.0.0.1:2181"
    session.timeout = 6000
    connect.timeout = 2000
  }
  etcd3 {
    serverAddr = "http://localhost:2379"
  }
  file {
    name = "file.conf"
  }
}
第三步: 实体类domain(根据order订单表创建即可)
第四步: dao接口定义业务方法,resources的mapper下创建对应的映射文件和sql语句
@Mapper
public interface OrderDao {
    /**
     * 新建订单
     *
     */
    void create(Order order);

    /**
     * 修改订单状态,从零改为1
     *
     */
    void update(@Param("userId") Long userId, @Param("status") Integer status);
}
第五步: service定义接口和实现类
OrderService 接口
public interface OrderService {
    void create(Order order);
}
StorageService接口,使用openfeign远程调用
@FeignClient(value = "seata-storage-service")
public interface StorageService {

    @PostMapping(value = "/storage/decrease")
    CommonResult decrease(@RequestParam("productId") Long productId, @RequestParam("count") Integer count);

}
AccountService 接口,使用openfeign远程调用
@FeignClient(value = "seata-account-service")
public interface AccountService {
    /**
     * @param userId
     * @param money
     * @return
     */
    @PostMapping(value = "/account/decrease")
    CommonResult decrease(@RequestParam("userId") Long userId, @RequestParam("money") BigDecimal money);

}
OrderService 接口实现类
@Service
@Slf4j
public class OrderServiceImpl implements OrderService {
    @Resource
    private OrderDao orderDao;
    @Resource
    private StorageService storageService;
    @Resource
    private AccountService accountService;

    /**
     * 创建订单->调用库存服务扣减库存->调用账户服务扣减账户余额->修改订单状态
     * 简单说:下订单->扣库存->减余额->改状态
     * 注释掉 @GlobalTransactional 的时候,需要注意下方这个方法里面手动模拟了延时,也需要注释掉
     * com.atguigu.springcloud.alibaba.service.impl.AccountServiceImpl#decrease(java.lang.Long, java.math.BigDecimal)
     */
    @Override
    @GlobalTransactional(name = "fsp-create-order", rollbackFor = Exception.class)
    public void create(Order order) {
        log.info("----->开始新建订单");
        //1 新建订单
        orderDao.create(order);

        //2 扣减库存
        log.info("----->订单微服务开始调用库存,做扣减Count");
        storageService.decrease(order.getProductId(), order.getCount());
        log.info("----->订单微服务开始调用库存,做扣减end");

        //3 扣减账户
        log.info("----->订单微服务开始调用账户,做扣减Money");
        accountService.decrease(order.getUserId(), order.getMoney());
        log.info("----->订单微服务开始调用账户,做扣减end");

        //4 修改订单状态,从零到1,1代表已经完成
        log.info("----->修改订单状态开始");
        orderDao.update(order.getUserId(), 0);
        log.info("----->修改订单状态结束");

        log.info("----->下订单结束了,O(∩_∩)O哈哈~");

    }
}
第六步: controller接口
@RestController
public class OrderController {
    @Resource
    private OrderService orderService;


    @GetMapping("/order/create")
    public CommonResult create(Order order) {
        orderService.create(order);
        return new CommonResult(200, "订单创建成功");
    }
}
第七步: 主启动类
/**
 * exclude = DataSourceAutoConfiguration.class 取消数据源的自动创建,
 * 读取自定义的DataSourceProxyConfig.class类,使用Seata对数据源进行代理
 * @EnableDiscoveryClient 该注解用于向使用consul或者zookeeper作为注册中心时注册服务
 */
@EnableDiscoveryClient
@EnableFeignClients
@SpringBootApplication(exclude = DataSourceAutoConfiguration.class)
public class SeataOrderService2001Application {

    public static void main(String[] args) {
        SpringApplication.run(SeataOrderService2001Application.class, args);
        System.out.println("启动成功");
    }
}
上述代码可知OrderService 接口实现类中涉及到了多个业务操作,于是就要进行事务管理,使用@GlobalTransactional(name = “fsp-create-order”, rollbackFor = Exception.class)注解,指定业该方法中遇到Exception异常就对多个事务进行回滚操作